ANDREW'S "WATER RATTE"
At the end you will find a series of pictures with explanatory notes. These compliment Andrews work very well.
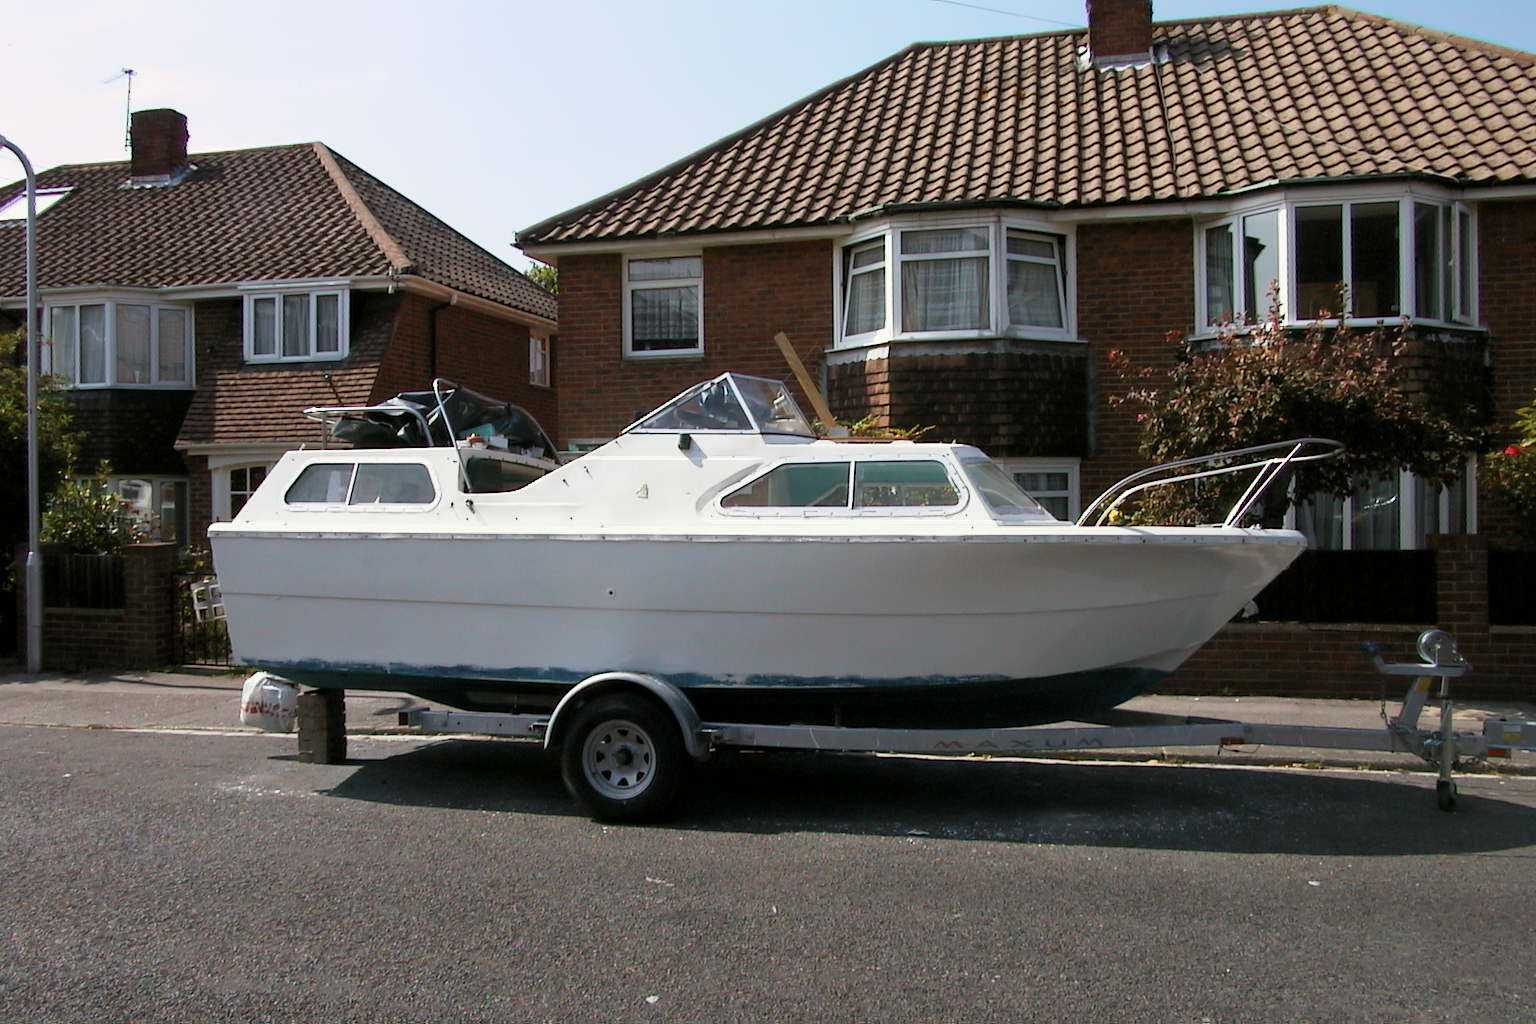
A while ago I bought a Norman Conquest. I’ve sailed in dinghies for many years and had regular canal holidays by narrowboat but had never owned a motorboat before. This is a brief write up of how I refitted the Conquest, which may help someone else with one of these fun little boats.
When I bought the Conquest she was a mess. The boat had lain, unused and unloved, in some weeds at Harefield for some time. However, she did have three years on her safety certificate to run and some of the wiring obviously worked. The canopy was aging but intact, there were missing external lights and some of the woodwork was grotty beyond belief. As far as I could tell, the hull was sound and the yard staff assured me that the motor had run when she was brought in. We agreed a price that included the engine being given a thorough service, changing the oil in the lower unit, new impeller and plugs and it ran beautifully when we collected the boat.
Getting the boat home I assessed what needed to be done.
Where to start? I began by giving everything inside and outside, a good clean. A pressure washer was invaluable here. While cleaning the outside of the boat I removed anything loose or broken, such as the remains of navigation lights and the rubber fender. A day’s work resulted in a clean boat and a great improvement in morale; suddenly things began to look possible again. The next stage was to remove all of the old paint on the decks and hull. I used Dilunette for this, a substance specifically designed to strip paint from grp. Whatever you do, don’t use Nitromors or similar, it will attack the grp as well. Dilunette will be available in any chandlery. Again, the pressure washer was used to clean off old paint that had been lifted and softened by the stripper. I also stripped the varnish from the wood inside the cockpit. I removed the old wooden handrails from the cabin roof as they were rotting and I had some teak with which to replace them.
Once clean I filled all the holes, chips and scrapes in the hull with gel coat filler, rubbing it down well to give a smooth finish. I wasn’t planning on leaving the gel coat unpainted and so smooth perfection didn’t happen, the eventual repairs had to be painted over to conceal the dull rather than shiny finish. If you want shiny then its hours of work with 600 grit wet and dry. Life is too short at times. I did rub down the hull to provide a key to the primer paint, one coat of primer, two undercoats and two topcoats of white yacht paint. I painted the lower parts of the hull, to the waterline, with antifouling paint suitable for inland waterway use. Most of the paint was acquired from boat jumbles at less than normal prices but in battered cans. This made the job affordable. I masked off metal fittings on the deck that I didn’t want painted, pulpit stanchions, cleats and the like, before painting the deck with primer and undercoat, followed by two coats of deck paint, which is rubberised to reduce slipping. I glued textured non-slip matting in various places on the deck to give more safety to deck work. The boat has moulded treads in places on the side decks and I fixed the matting to these with the recommended two part adhesive. Both the gas bottle and the fuel tank were kept in baskets on the transom. I removed the baskets, bent them straight again and refixed them with new stainless steel bolts and good big penny washers inside the hull. To finish off the hull I reattached the rubber gunwale with new stainless steel screws, about 100 of them. The end result wasn’t perfectly straight but at least it was all there and all attached to the hull. I also added corner fenders on the quarters and a wooden cover over part of the engine bay. The bent pulpit couldn’t be helped.
The rear and fore cabin roofs needed little work beyond cleaning and fitting new handrails and mast, made of teak bought at a boat jumble. I also bought a life ring and bracket at the jumble and fitted these to the railing around the stern deck, laughably called the sun deck by the children. The windscreen windows were another matter entirely; they were obviously aged and scratched, especially in front of the helmsman, where the wiper was fitted. The only solution was replacement. Fortunately getting new glazing (OK, acetate) was easy, I took the old shapes into a local sign makers works and had new acetate cut for the cost of the acetate and a few beers for the operative. Getting the frames back together again was a pig of a job and the result shows that a hammer was used con brio at times, the profanity has now, however, been forgotten. The effect was well worth two nights labour in the workshop. Unfortunately the rubber extrusion on the top of the screen had perished beyond all hope and my efforts with adhesive and half round rubber beading have not been too successful, the side windows get used as a handhold when boarding and the beading keeps coming loose.
The mast carries a steaming light and the tunnel light. Maritime regulations prohibit both being on at the same time, so the circuit is arranged to prevent this, by means of a two-way switch. The tunnel light, in traditional canal manner, is a car fog light; navigation lights are proper ones from the local chandlery. The horn is a Halfords twin air horn with the compressor in the head compartment. Works very well, and was dirt cheap. Being plastic it won’t rust either.
The final job involved a lot of elbow grease. I bought some grp cutting compound and grp polish from the chandlery and cleaned and polished all the upper works. The elderly plastic and dull appearance was transformed by this job and the end result was worth the two days spent with the cleaning and polishing rags. Some big flat surfaces such as cabin roofs were polished with a machine, but the entire initial cutting back exercise and all the polishing on small areas such as around windows was done by hand.
Given that this is the bit those jealous types stuck on the bank get to see I wanted the cockpit to be pretty. However, its not living space and had to take a back seat when time was being allocated and as such a better job could have been done. The original vinyl seats were cracked and instead of replacing the vinyl I patched them up with gaffer tape. The sides of the cockpit were thin ply covered in matching green vinyl and I left these, although I removed the corroded and dead speakers and radio cassette from next to the helmsman. The blank area was filled with a wooden locker, which holds lock keys and mooring spikes. In front of the other seat (navigator?) are the water and bilge pumps under a step, as well as the 20-litre fresh water tank. Enough space is left for a shelf that holds odds and ends such as shoes or a toolbox. The main starting battery, a small 35Ah one from a Ford Fiesta is also under the helmsman’s feet.
The instrument panel was changed and added to. The original had the ignition switch, battery master key, fuse box and panel, navigation and spotlight switches. There was also a very moribund voltmeter and a broken clock.
The new panel has the ignition switch, voltmeter, horameter (engine hours) and clock, together with switches for the horn, navigation lights/tunnel light, panel lights and spotlight. There is a standard cigarette lighter socket which usually has a solar panel connected to it but will also run a GPS, recharge a mobile phone or any other low current application. The lighter socket runs directly to the battery, with a 2A fuse, in order to ensure that the output from the solar panel goes into charging the starter battery and not the domestic one.
There is now a set of folding doors to the stern cabin, these achieve ventilation by a mixture of deliberate gaps and poor fitting, and they can be locked with a hasp and staple if the boat is to be left. The door to the fore cabin had a nice shiny brass ventilation grille fitted to replace the broken plastic one.
A fire extinguisher is kept in front of the helmsman, ready for use if there is a fire in the cockpit or fore cabin. Next to the cabin door are two clips into which a telescopic boathook is fitted.
In front of the navigator’s seat is a pocket similar to a car door pocket. This is idea for copies of Nicholson and similar.
The children’s domain when family cruising takes place. The cabin was rather dingy with a dirty white textured paint on the deckhead and dark green vinyl covered sides. Neither of the lights worked and one of them was missing many parts. A partition divided the deck space to create a locker area under the engine well, but the locker had no cover. The engine well had a fabric cover that fitted to studs around the well, but the cover did not fit too well and made the cabin draughty, as well as letting in noise and exhaust fumes from the engine. Under each moulded bunk is a void space with a hinged wooden lid. These bilge lockers were smelly and dirty; they were hosed out and cleaned. The lids were sanded down and re-varnished; the hinges were replaced on one of them.
I removed the cabin lining and repainted it, and the deckhead, with nursery paint from Woolworth’s in “Engine Blue”. With new brass screws fixing the side lining the whole cabin became a far brighter place. Dark blue curtains set off the effect and made the cabin very cosy at night. A friend who was breaking a caravan donated some lights (as well as the water pump) and one of these was fitted above each bunk.
I subdivided the stern locker to make another battery compartment into which I fitted a 120Ah leisure battery to run domestic services. The master key for the domestic battery lives atop the stern locker, with a BSC required sticker to indicate its position. The batteries are managed by a ZiG system, just as in our camper van. The ZiG fits neatly into one of the small shelves at head level in the cabin, losing a shelf but gaining battery control in the process. The ZiG also has mains power input via a standard external socket above the engine and an earth leakage circuit breaker suitable for caravan use. A single mains socket is fitted in the stern cabin. The engine has the earth wiring attached to it, as a wire dunked in the cut is an excellent earth. The stern locker had a top fitted, part of which hinged to give access, or the partition could also be removed if the battery had to come out. I made two plywood doors for the engine bay, fitting rubber seals around the edges and overlap. They made a huge difference to noise and draught, even if they were an awkward job to fit. They can be locked to prevent small fingers getting at the engine, or larger and lighter ones trying to get in from outside.
I made wooden panels that fill the gap between the two bunks, allowing the cabin to be a double berth if wanted, although use as double takes some care as the doors cannot open with the double set up. The infill cushions are old ones from a long dead sofa! Fitting a suitable fire extinguisher and a carpet finished the job.
The two sliding windows had moss and mould growing in the channels and some of the seals had rotted. The windows did not leak and once the moss was cleaned out and the mould killed off they slid open and closed as required.
This was a mess and needed a lot of work. I started with the galley, which was coming apart. The wood was mostly all right, being marine ply, but the fastenings were rust traces here and there. I used the various bits of wood as patterns to get basic shapes, together with measuring carefully. Anyone doing this please note that the galley area isn’t especially symmetrical, straight or even square. The original galley, as far as I could tell, was a cupboard having two shelves and a small sink let into the top. The cooker was placed on top of the cupboard, it may have been a simple hob but the height of the gas pipe suggested otherwise. Marks in the cupboard suggested a separate oven had been fitted, I dread to think how it was plumbed in as the implication was a tee in some flexible hose.
The new galley has an inset hob/grill/oven with the hob just under the worktop and a hinged cover in matching worktop. The inset hob allows safe boiling of kettles etc when under way and the cover gives working space or somewhere for the washing up to dry and drain (the cover drains into the sink, by design, honest!). Under the sink are two shelves for food and utensils, crockery and so forth, as well as a small drawer for cutlery and the all-important bottle opener. Under the oven is another shelf for pots and pans. The whole galley structure is varnished with quick drying teak varnish and looks quite respectable. I have fitted a spotlight above the sink which gives plenty of illumination if cooking after dark, there is also a press switch to run the water pump placed in a corner out of the way. It is possible to cook standing up with head out of the hatchway but I am idle and have a small folding stool.
Across the cabin from the galley is the head, or toilet compartment if you prefer. This was originally lined with tile effect vinyl wallpaper that had become very tatty. The compartment is under the dashboard and all the wiring runs up one bulkhead and some of it runs overhead as well. The intention was to cover this up with a thin sheet of ply, including access panels to the steering and reverse of major wiring points but time did not allow. The wires were tidied up and bundled to prevent them interfering with anybody using the head. Otherwise the important work was to paint the walls and ceiling of the compartment with a washable white paint, varnish the deck and fit a light. The compartment door had the nasty attempt at scumbling cleaned off it and a couple of coats of teak varnish to match the galley were put on instead. The ventilator was another old plastic one, but as it wasn’t broken I kept it, note that this ventilator can be closed, which might be vital after a curry night… Under the ventilator, on the outside of the door, is fitted the fire blanket so that it is easy to hand for the galley. On the inside of the head door is fitted a towel rail for dishcloths and a small bin for galley waste. The bin is the sort that re-uses supermarket carrier bags. There is enough space in the head compartment to hold not only a chemical toilet but also all the relevant chemicals, spare loo roll and so forth. The flexible water hose is kept there and the removable cabin hatch fits neatly at the back, out of the way.
Being one who likes decent coffee I had a 12V filter coffee machine, which needed a healthy current in order to work. I also like my white wine well chilled and so we wanted a fridge. The BSC makes gas fridges impossible and a thermoelectric cool box eats battery while not doing much cooling. The practical upshot of this was an expensive (£400) Danfoss compressor fridge from Shoreline (http://www.shoreline-uk.com/), which was very definitely money well spent. The current consumption is low when the compressor is running and the fridges are very well insulated. Ice in your G and T is normal. The fridge also has a dedicated power supply with the 15A fuse at the domestic battery and a switch/relay in the cabin, together with an idiot light to show that the thing is working, it is very quiet in action. Above the fridge is mounted the coffee machine, with its own high current lighter style socket, which also recharges 12V searchlights and similar higher current devices. There is also a standard caravan type 12V two-pin socket in the galley area and atop the fridge, a 12V electric kettle can plug in to these, or a vacuum cleaner. I even have a hairdryer!
Forward of the galley and fridge is the main seating area and dining table. The boat, when purchased, had no sign of any table at all, or even where it might fit to create the front double berth. Looking through the windows of another Conquest didn’t help much and so I had to fall back on the standard source of inspiration, how it worked in the campervan. After all, a small canal boat is essentially a floating camper van anyway. I needed to be able to fit a Desmo socket into the floor, with another under a table and a suitable leg length in between. The cabin deck of the Norman was of grp and I didn’t fancy fitting the socket to that, especially as there may well not have been enough depth between the underside of the deck and the bottom of the hull. The easy solution was a false deck. A flush fitting Desmo floor socket needs at least two inches of hole to slide into and a two inch thick false deck would be too heavy to move and too thick, making head room even less. A small sheet of 25mm marine ply solved the problem, with a small additional piece under the socket itself. The ply fills the floor space under the table and makes a stable base. The table pivots on its single leg, allowing easy access to both sides. The table acts as the infill for the front double berth and the Desmo leg drops into a locker under one of the bunks.
Stowage space for clothes and other gear is at a premium in a small boat and the Conquest is no exception. Being tidy helps, as does not bringing too much. I decided that a small shelf under the front windows would be very useful, more thin marine ply and teak varnish, with a good big lip acting as an edge to stop the shelf contents falling off, and as a stiffener to the 6mm ply. The front windows of the cabin were worse than the cockpit ones; they too were replaced with new acetate and new stainless steel bolts. The new bolts are longer than the old ones, I’ve never got around to cropping them off so care is needed when pulling the curtains, which match those in the stern cabin, as well as the cushions cum pillows. The window frames were well bedded in on fresh mastic and quite a lot of sealant was used around the glazing as well. They still leaked in heavy weather. The solution, for those that don’t know the stuff, is Captain Cuttle’s Creeping Crack Cure. This brilliant product runs into cracks by capillary action and dries to fill the crack. Just dribble it into suspect areas until it stops running in. Not to be used for big gaps but leaky seals and seams are where it scores. Get it from chandleries or campervan/caravan shops, even some DIY and hardware outlets may do it. The inside of the cabin was painted with the same Engine Blue and white scheme as the stern cabin and is now a bright and cheerful place.
A 12V strip light runs down the centre of the cabin ceiling, which provides plenty of light. Individual spotlights for the bunks never happened. The cabin is also carpeted to match the stern cabin. A medium green isn’t the best match with the blue and white, but I had it at home so it does.
Given that the boat, now named Water Ratte, would be used primarily on the Kennet and Avon and adjoining rivers I fitted an anchor. A 4.5kg Danforth (folds flat) attached to a few meters of chain and 30m of nylon warp allows anchoring in up to 10m of water with care. The anchor is hung from the pulpit rail and is kept there with a bungee. The anchor rope is coiled up and bungeed to the pulpit rail as well, the anchor chain is around the foredeck cleat. The bitter end of the anchor rope is attached to a suitable U bolt just in front of the cabin windows. I also fitted a bow roller to prevent the chain marking the bow. There are three mooring lines for general use, one each side on the stern cleats and one attached to the foredeck cleat. None of them are of ideal length but they have been OK so far, including taking to boat from Newbury to Limehouse via the Tideway. I have two spare petrol tanks giving a total of 18 gallons carried, which lasts several days at canal speeds, rather less time going upstream on the Thames. A gangplank made from old timber and aluminium section is kept on the stern deck. Three side fenders hang each side, the bow has two fenders and the baskets on the stern have fenders as well.
Water Ratte was a lot of fun while I owned her, the refit was hard work but the result was worth it. I sold her to a friend when we traded up to go to sea and still have access to her on occasion. The engine has been changed to a four stroke 9.9HP from the two stroke 35HP; the new engine has a far better alternator and actually charges the batteries rather than merely slowing their discharge!
If I had been able to find a 32 while boat hunting last year I might have bought that instead!
If any reader has any queries along the lines of “how did you” feel free to get in touch via the website.
![]()
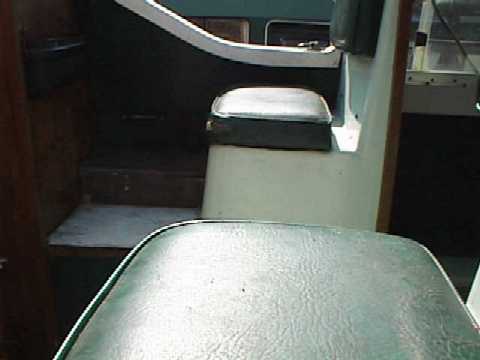
The cockpit of Water Ratte as bought. Note the speaker and radio/cassette. These were totally beyond repair and removed. The location of the speaker and radio is now taken up by a wooden locker that stores windlasses, anchor spikes and similar. The light by the door is one that worked when I viewed the boat before purchase; however if you turned it on the cover fell off.

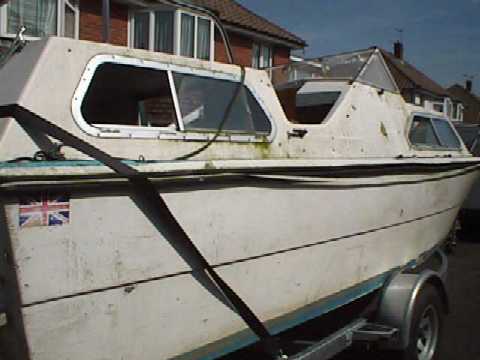
This is the boat they day after I got her home. Filth and grime abound everywhere. The canopy (grubby but intact and serviceable) has been taken down, otherwise she is shown as bought.
After drying up the standing water, but before cleaning off any mess. Note the tidemark of scum. I had removed the locker hatches in order to gain access to the bilges. The seat cushions were out, being cleaned (washing machine!) and repaired.

Note the missing ventilator in the cabin door, the shattered clock and the single gauge being a voltmeter (also broken) The red tape covers a hole! The large button controls nothing, there was no horn still fitted.
Bit dark this one. You can just make out the other radio/cassette (also broken) and the locker for Nicholsons etc. The footrest in front of the navigator’s seat, and the step behind it, are where the water tank is now (and may have been to start with).
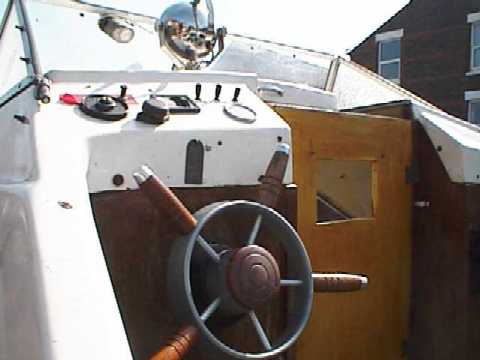
What a difference some work makes. The hull has been painted but the antifouling and boot topping have not yet been applied. New teak cabin roof handrails are fitted and the mast is being designed, again using teak. The starboard navigation light is fitted.
A view of the stern cabin work in progress. The windows need cleaning! Note the engine bay doors and the ventilation slot above. The weather was very hot that day, so the usual vinyl cover was not behind the doors, which would block the ventilation hole and I needed the air. The locker under the engine well is completed; the hinges can be seen showing the lifting section. The entire front also slides out to allow the domestic battery to be removed, it s on the right side from the view in the picture. The cabin doors have not yet been fitted. The painting is complete, I was fitting the lights and wiring up the ZiG at the time of the picture.
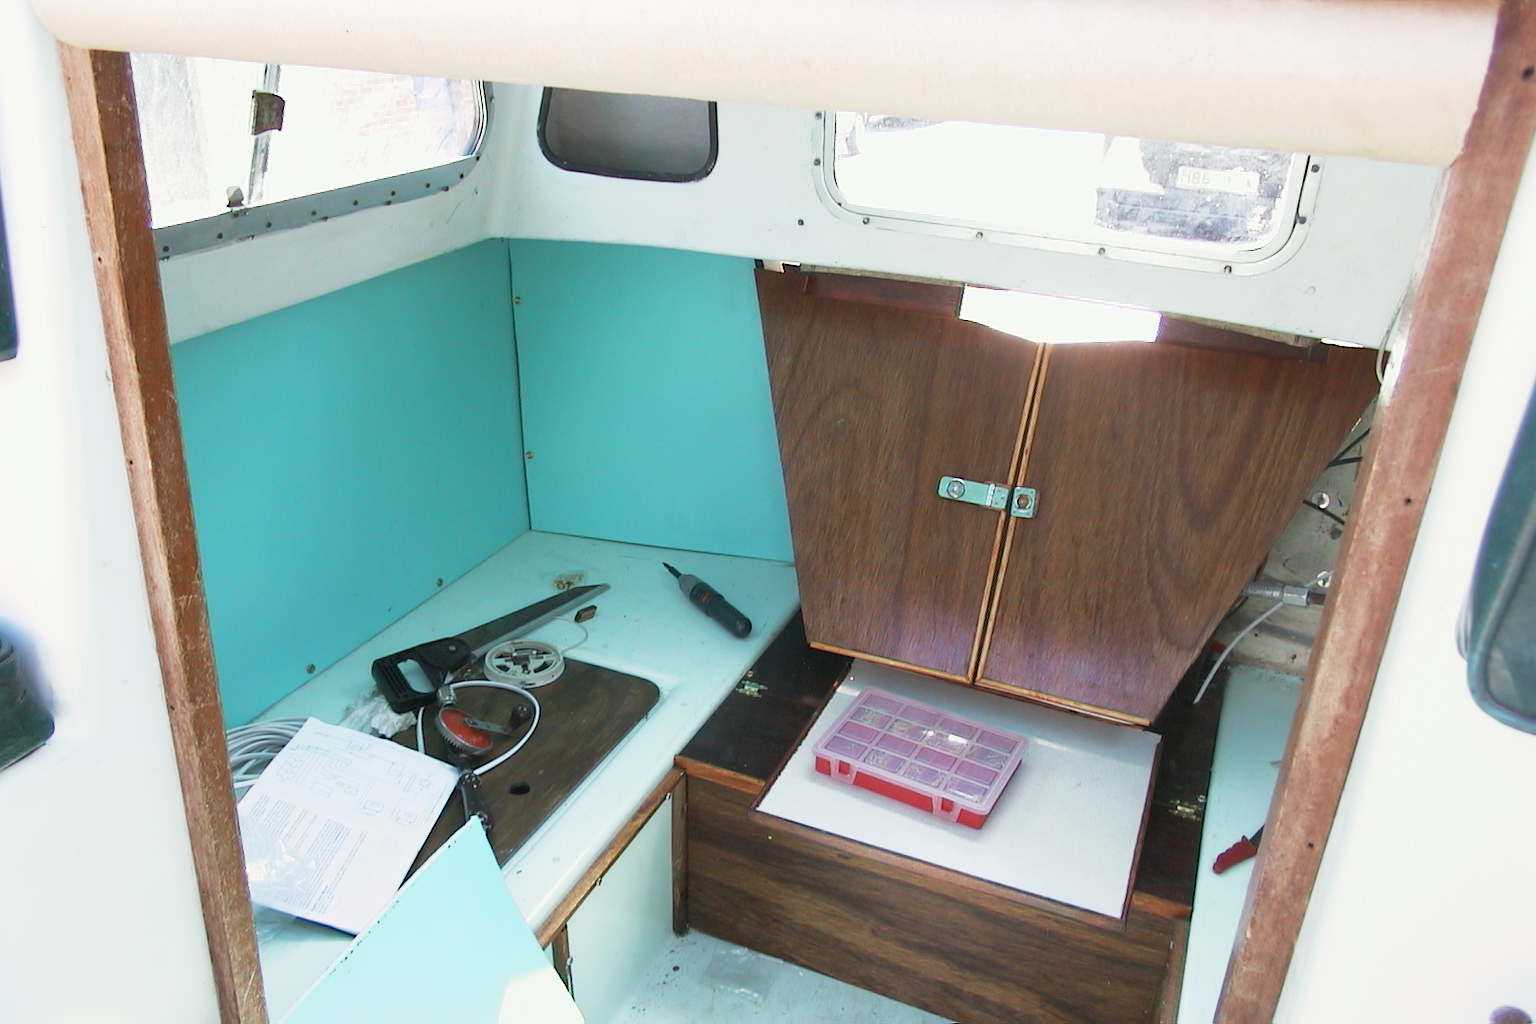
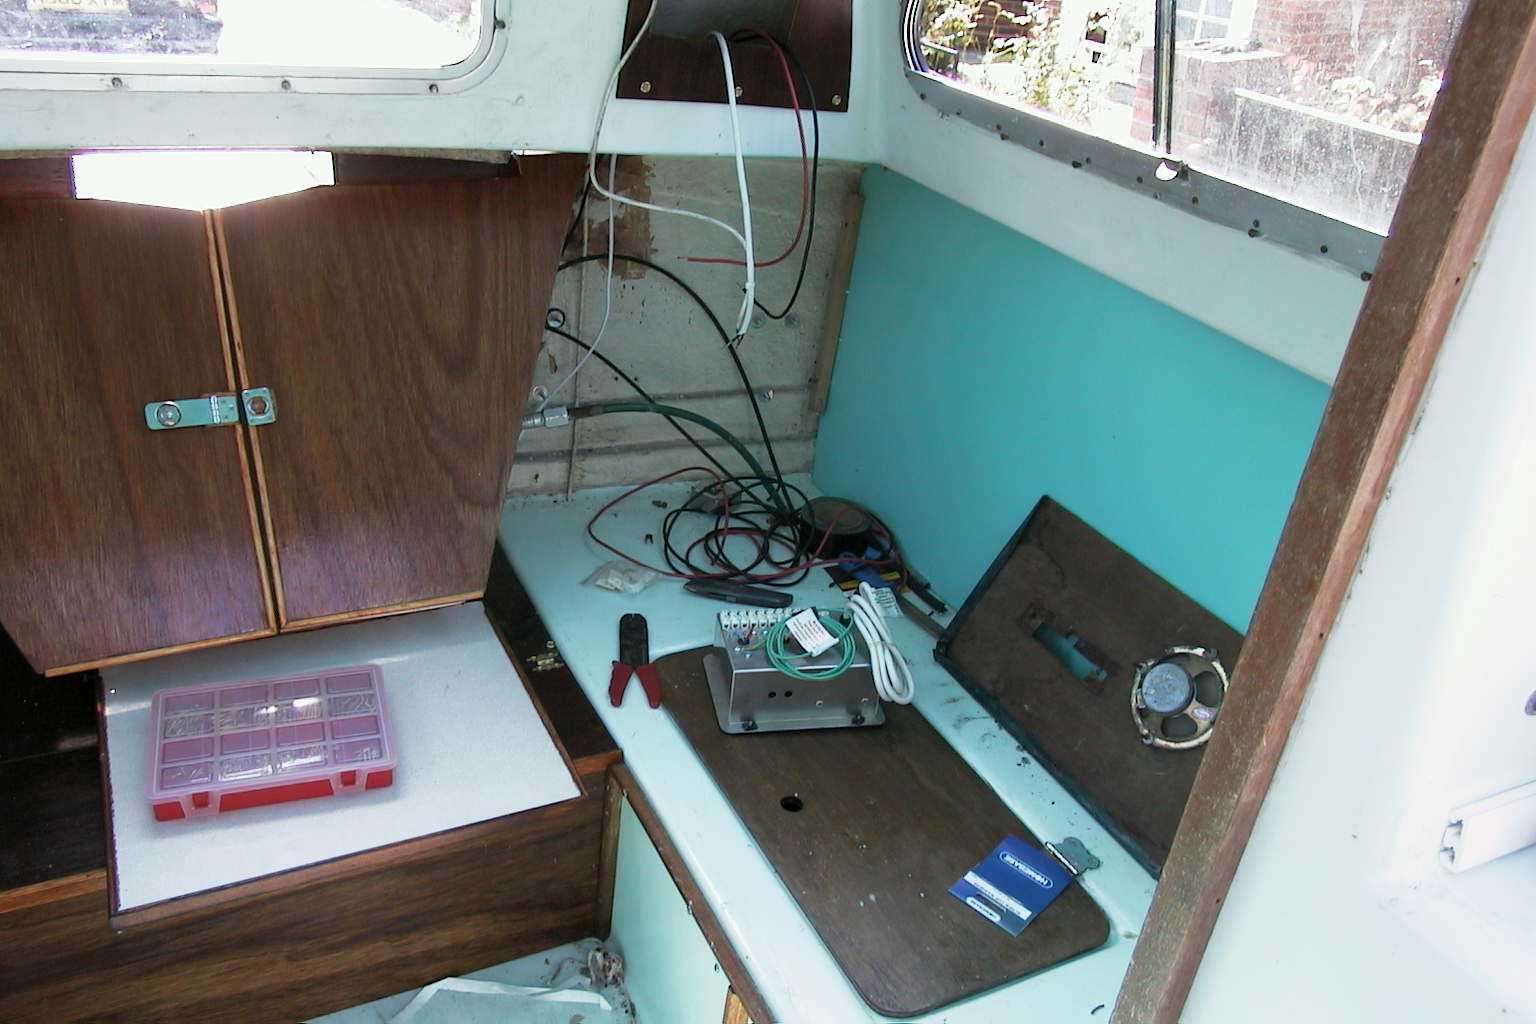
A small locker was sacrificed for the ZiG units, which is being fitted in this shot. Note the missing panel allowing access to wiring, and the big penny washers that support the fuel tank basket fastenings. The speaker is in a discarded cockpit panel that had yet to be thrown away. The plate under the red box of screws is the cover for the hob, made but not yet fitted. In the extreme bottom right hand corner you can see what looks like Swish curtain rail. It is Swish curtain rail, which makes very good drawer runners.