TOGETHER WE CAN FIX IT
This page will hopefully develop into a treasure chest of solutions to all our Norman related problems and may they all be wee ones!
While boating is, for us at least, a very pleasurable pastime, there are dangers both hidden and obvious. Just consider our regular encounters with electricity, gas, petrol and diesel, not to mention water!
As Norman owners we tend to concede that we are the "affordable" arm of boating and look for ways of minimising costs. This often involves extensive DIY and we all have different levels of competence and expertise.
This website exists to share this and pool resources and advice is freely and willingly given and received. Please be cautious and careful when carrying out work on the various systems.
The Boat Safety Scheme exists for our and others safety and requires "competent" installation work on the parts it covers. The advice given here is provided in the knowledge that, with competence, the suggestions made can be carried out and used safely.
HOWEVER!
The website and its contributors cannot take responsibility for consequences or occurrences that may arise out of the use of any information presented here.
Of course we will not post anything that is inherently dangerous or risky but would insist that if you have the slightest doubt about your competence or capability then don't do it. Get someone who is recognised as being able to safely and efficiently carry out the work.
ABOVE ALL - BE SAFE AND ENJOY YOUR BOATING
![]()
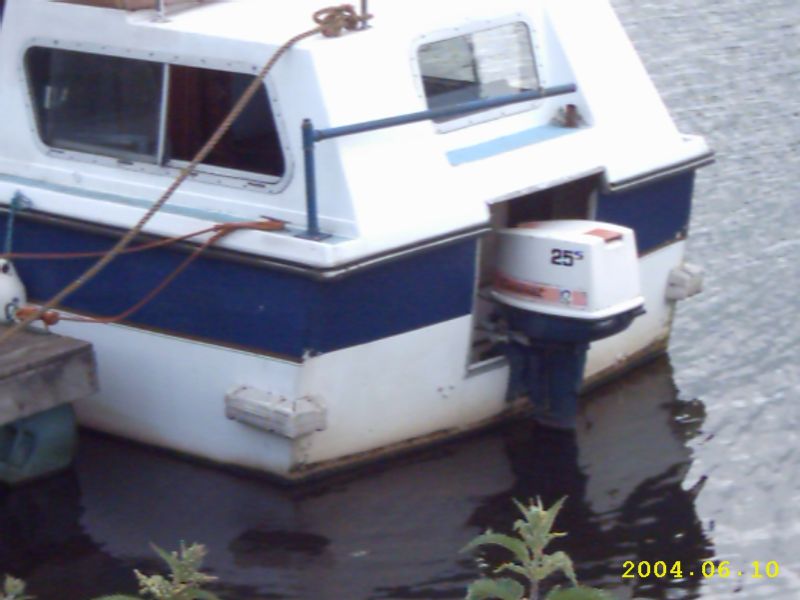
COLIN'S OUTBOARD LIFTING AID
I made a swinging davit for mine out of old gas/water pipe, it had the 90 degree fitting on it already when I found it, the base was made using the next size up pipe welded to a steel plate bolted to the deck, it is supported by a bracket bolted to the transom about 18" below .
I have a small block and tackle to lift the outboard off the transom, then swing the whole lot on to the pontoon. I've done it many times on my own, but it is easier with two. The davit can be easily removed, or you can leave on if you want to look posh! The davit has been strengthened since the photo as my engine now weighs 55 kilos.
Regards Colin (The Yorkshire Ouse)
![]()
Flaws or Floors in the Norman 23.
(Courtesy of Ernie)
I’m not sure if it was standard practise to put curved floors in the 23 but when I bought mine the previous owner told me he had been happy with the system for the past fourteen years and it did give an extra three inches or so of headroom in the main cabin. Unfortunately due to the fact that my feet are arthritic, I found that walking or standing on a curved surface was less than comfortable. The upside was that I am not very tall, probably about five feet seven inches in my sweaty socks, and consequently headroom was not a problem.
I removed the floor boards which were laid along the length of the boat and relaid them, together with a quantity of new timber, across the floor area, screwing them down onto free lying lengths of two by two timber posts. The whole area was covered by four separate sections to enable me to lift any of them as and when required to clean or dry out the bilges.
resultant ‘well’ filled with new carpet. It was only necessary to fix one lifting point as once the first section had been lifted the rest were easily removed as required.
The flat floor gives the impression of an increase in floor area and has proved to be much more comfortable to walk on.
I have perhaps been fortunate in that the system suffers from no undue creaks, groans, wobbles or rattles to date but my fingers remain firmly crossed.
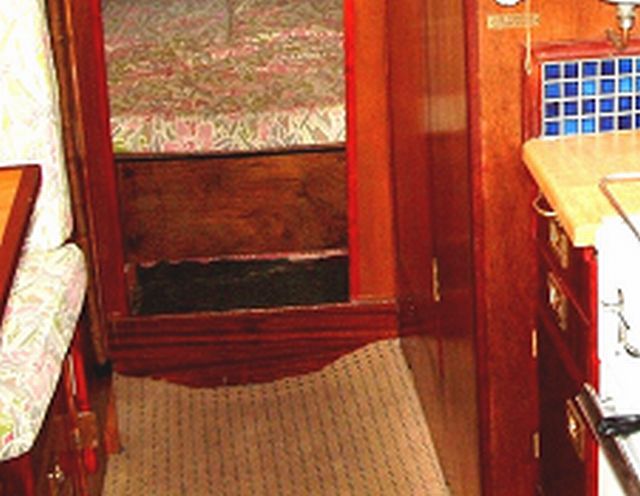
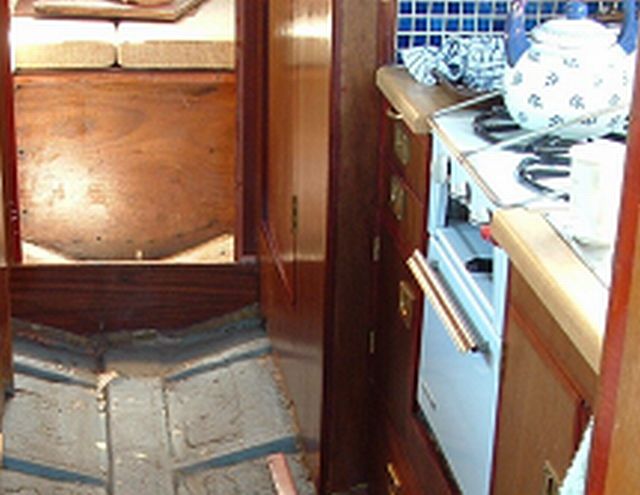
Curved floor Curved floor removed
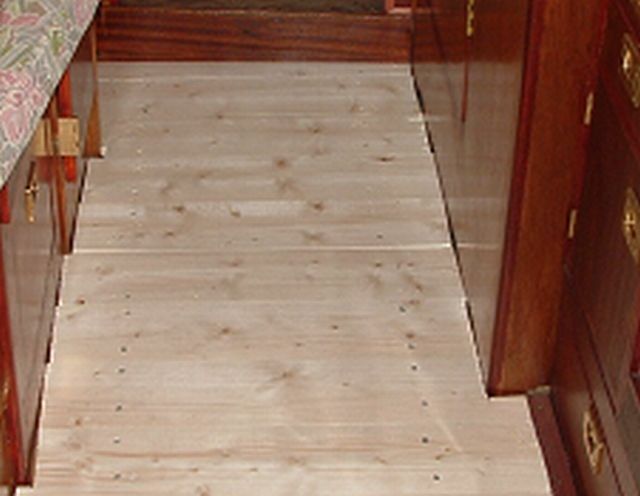
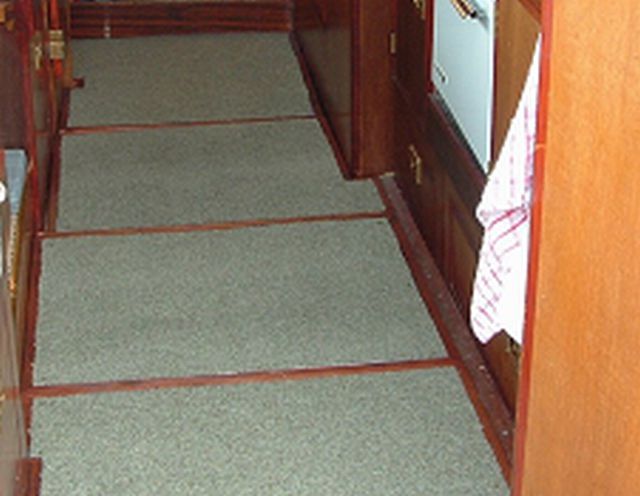
New floor boards running across cabin Floor sections completed
![]()
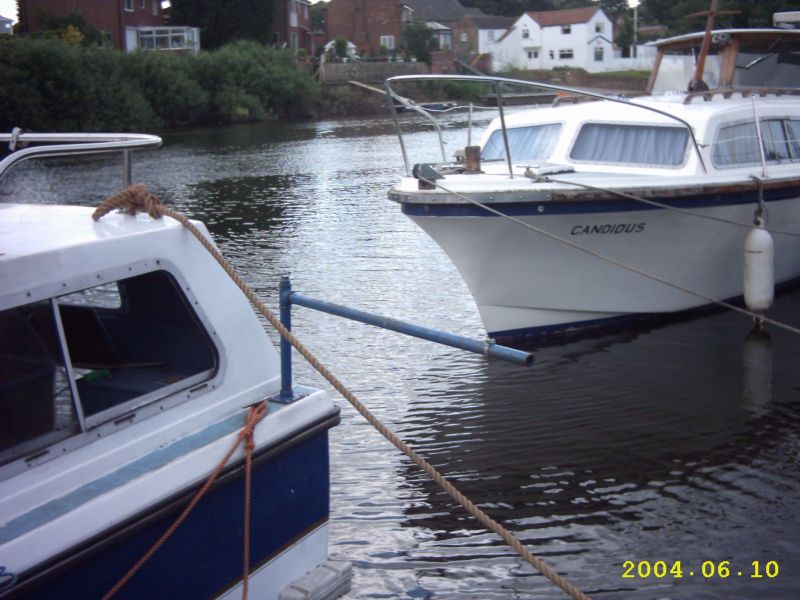
How do we prevent that green stuff from taking over the gunnels?
Here we have the answer courtesy of Andrew!
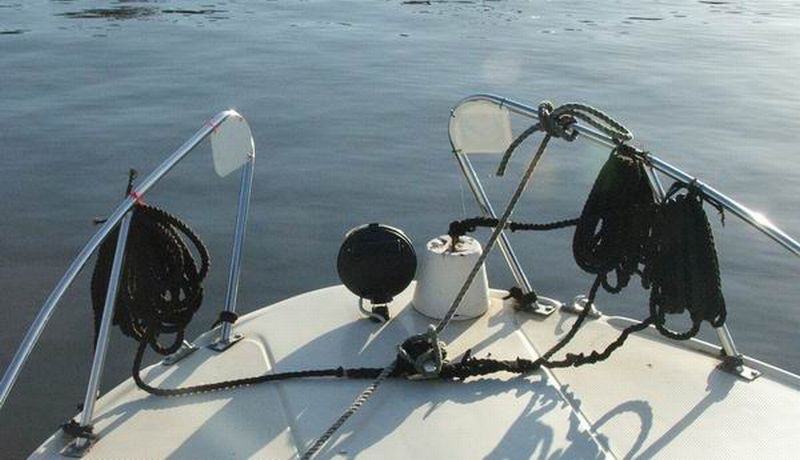
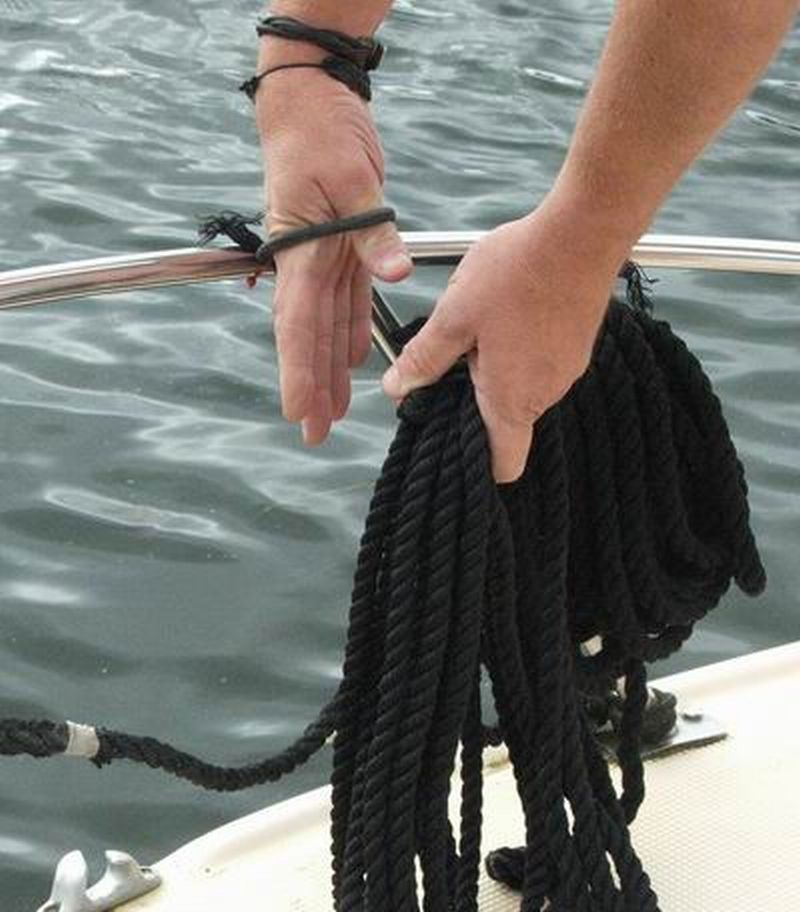
Rope Holders
I mentioned this in the forum under the title, No More Green Decks. As I can only run up to the boat every other weekend, and this Summer seeming wetter than most (I have had two dry weekends and a wet fortnight in Norfolk this year, so far). Anyway the result of the general dampness was a green growth on the decks, that was hard to scrub off and a green tinge to the “posey” black ropes, as my timber cruiser friends call them. I did think of hooks, but did not fancy having anything stuck to the pulpit that would catch either me or passing trees, fishing gear etc!
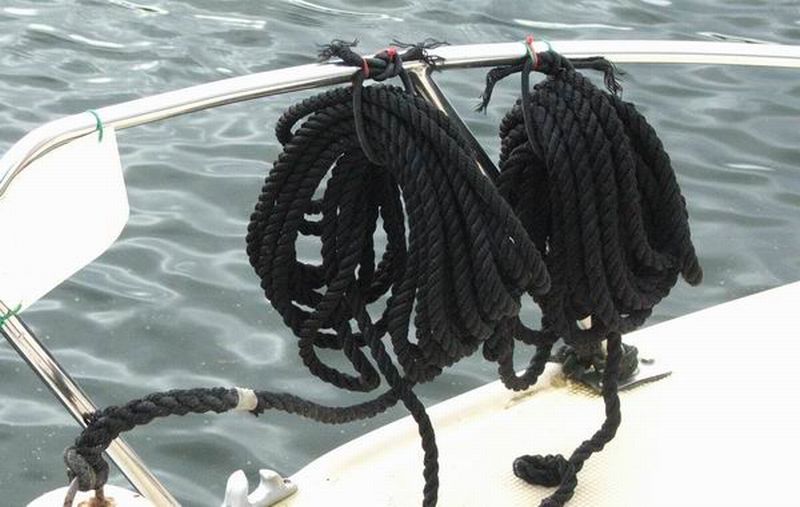
Simply put a small length of thin black bungee was tied in a loop and then cable strapped to the pulpit. Two one side and one the other, you may even want to colour code them, this tendency depends on your general level of “yachtiness”.
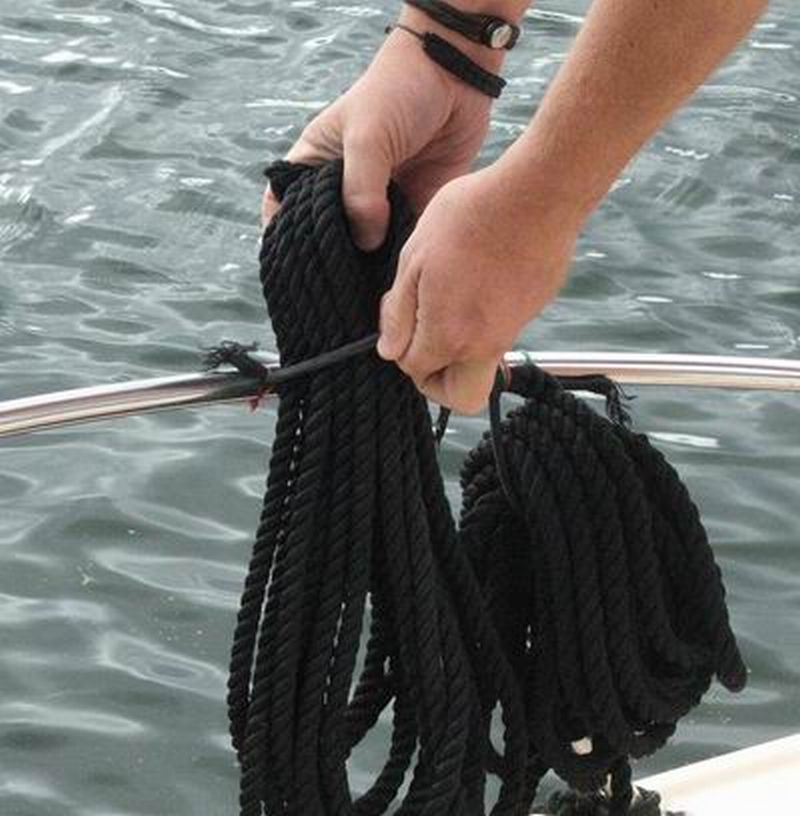
In use, the pictures show it all. It is a case of coiling down the warp, then passing one hand down through the bungee loop. Pull the bundle of rope halfway back, and there it hangs. Ready to drip dry. No tangles, either. If needed in a hurry, just grab a bit of rope and pull, it will feed out and then fall free. At the worst the rope will pass through the loop between you and the boat. The bungee stretches and if the pull is sufficient the small cable straps will break before anything untoward happens. I used coloured cable straps about 2mm wide.
On a windy day, up on Hickling broad, I was doing my good deed bit and recovering a reed stranded dinghy. The young occupant had been picked up by the safety boat some time previous. I had tied up the dinghy and was towing it out to the deeper waters of the broad, the rescue boat was none to happy about venturing onto a lee shore. I handed the dinghy over and was pulling away, when there was an ominous thud from the stern drive and a characteristic vibration that suggested that I had just collected yet another Roy’s bag. I vibrated my way to a mooring at the broad entrance and when tying up found that the port stern rope was now five feet long. I lowered my self over the stern. And felt around the prop. Wrapped nicely in the blades was the other 25ft of rope. All undamaged, but for the last foot. This had become unravelled. Useful for the new eye splice at any rate.
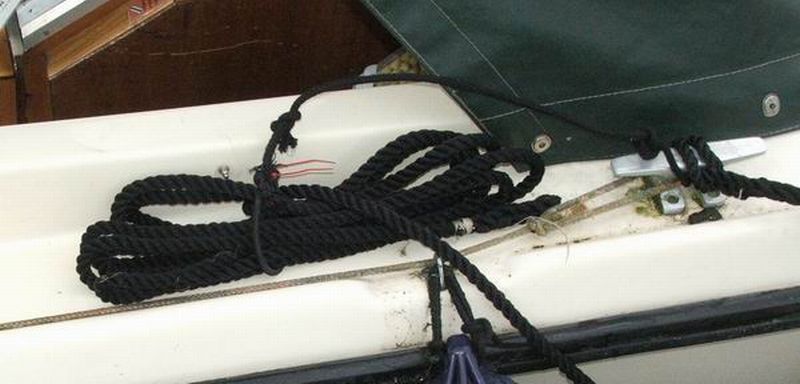
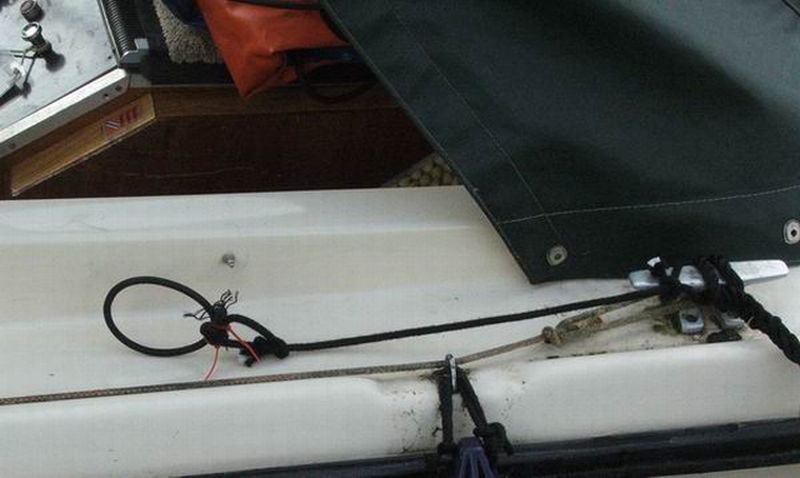
I did not want this to happen again, so thought around the pulpit rope idea. Hence the stern version. It works the same way, except that a short length of thin rope holds the bungee loop onto the stern cleat. In use the warp is fed through the loop and then dropped into the cockpit. The rope is ready for use and stowed out of the way. If it is forgotten and left on the side deck, it still wont reach the water. Again it is ready for immediate use too. Sorry if you found the above long winded, but the pictures should say it all really. Shame it has taken me four years to come up with the idea.
Now. How about cutting that Norman 20 loo door down the middle so you no longer have to “limbo” around it?
![]()
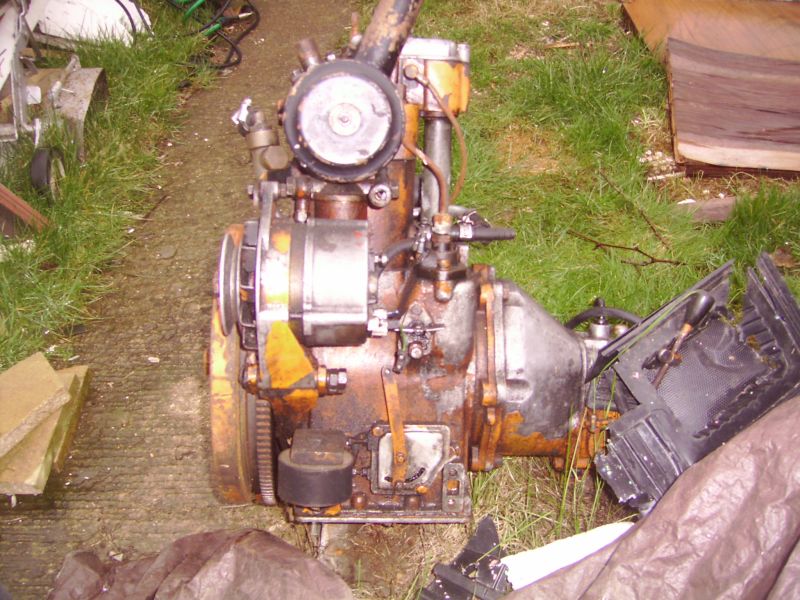
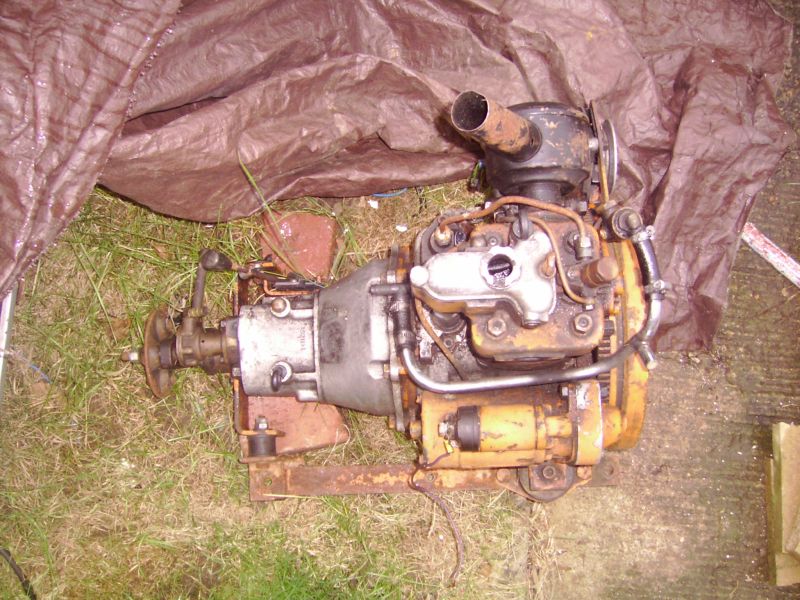
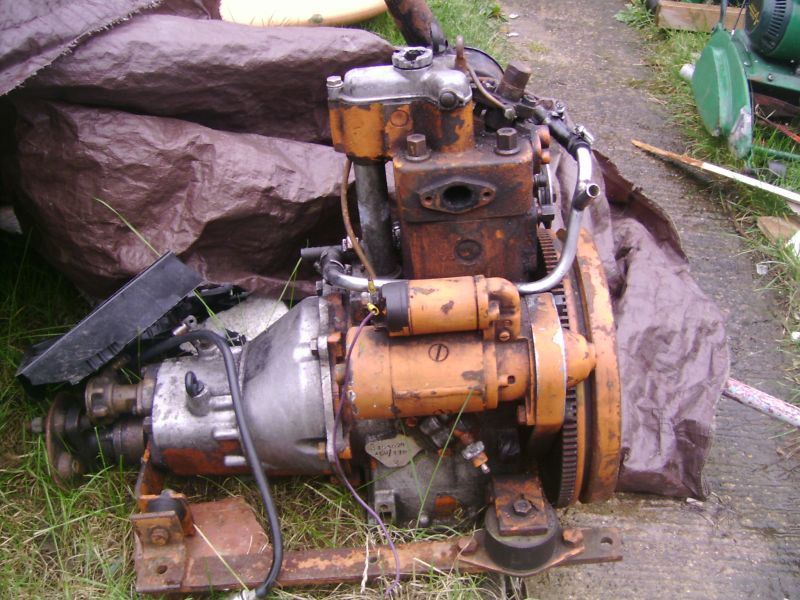
Right you engine boffins, get your grey matter ticking on this from Bill......
"Hello it Bill Taylor with another problem I have a single cylinder diesel engine and gearbox that runs but I need a few spares. And here is the problem it had no makers name on it or model number . just lots of numbers which mean nothing to me i.e
450/1191
3154975
and 151361 attached are some pictures can you tell me who made it or tell me how I can find out what model it is
thanks Bill"
![]()
For those wanting to varnish !
I "pinched" these two pieces from another site as it seems very sound advice.
Its is
difficult to produce varnish work as good as Freeman original. I
would NOT use stain. Best to remove old varnish/button polish with stripper
and wire wool. Then most important wash with Barden & Stevens Wood Cleaner
( Southampton 023 8039 4993) then varnish. You will not believe how the
light and stained (water stains) disappear to leave a rich colour.
Varnishing would take pages to explain but I currently used Vernis Le
Tonkinois (Derek Murkin 01189 671504). 4 or 5 coats with rub downs from
coat 3, wet & dry with water & soap etc.. The veneer is very thin so watch
out for rubbing through especially on edges.
and
The
Nitromores Specialist Varnish remover has meant that at no point so far
have I had to use any form of wire wool/scraper etc to remove the
varnish, this has given me a total flat varnish free surface to work on.
A quick rub down with white spirit and a coat of B&Q mahogany wood
stain, this has slightly darkened the appearance and totally
covered any lighter patches as well as bringing out the grain. I gave
one panel a coat of varnish this morning to get an idea of the finished
result, I can only say that the finish is fantastic and I am completely
satisfied. Especially as all the materials were easily purchased
locally, cost about £25 and with a few days fairly easy work made my
woodwork look beautiful again.
Thanks to the Freeman News Group
![]()
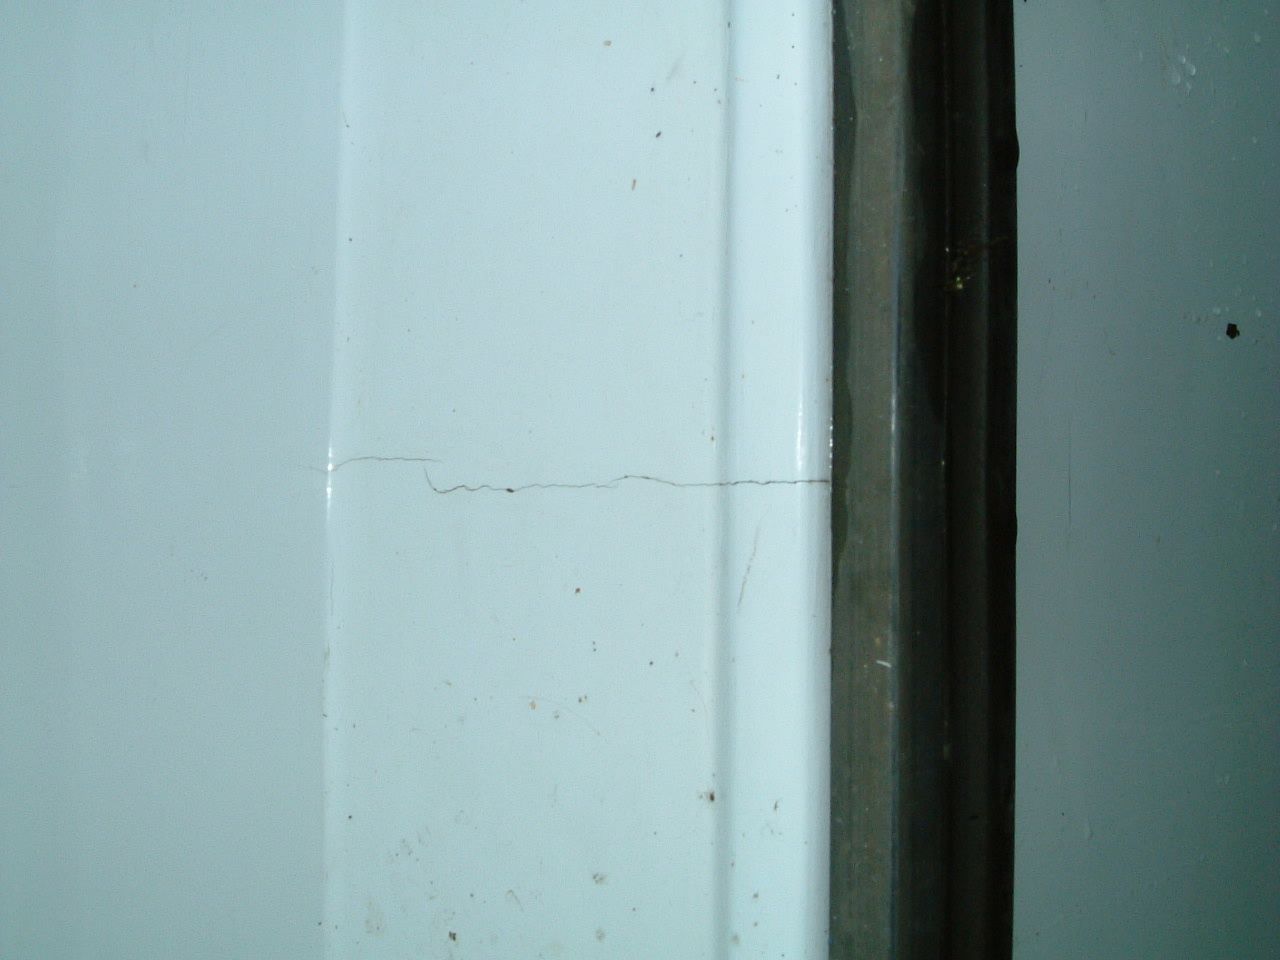
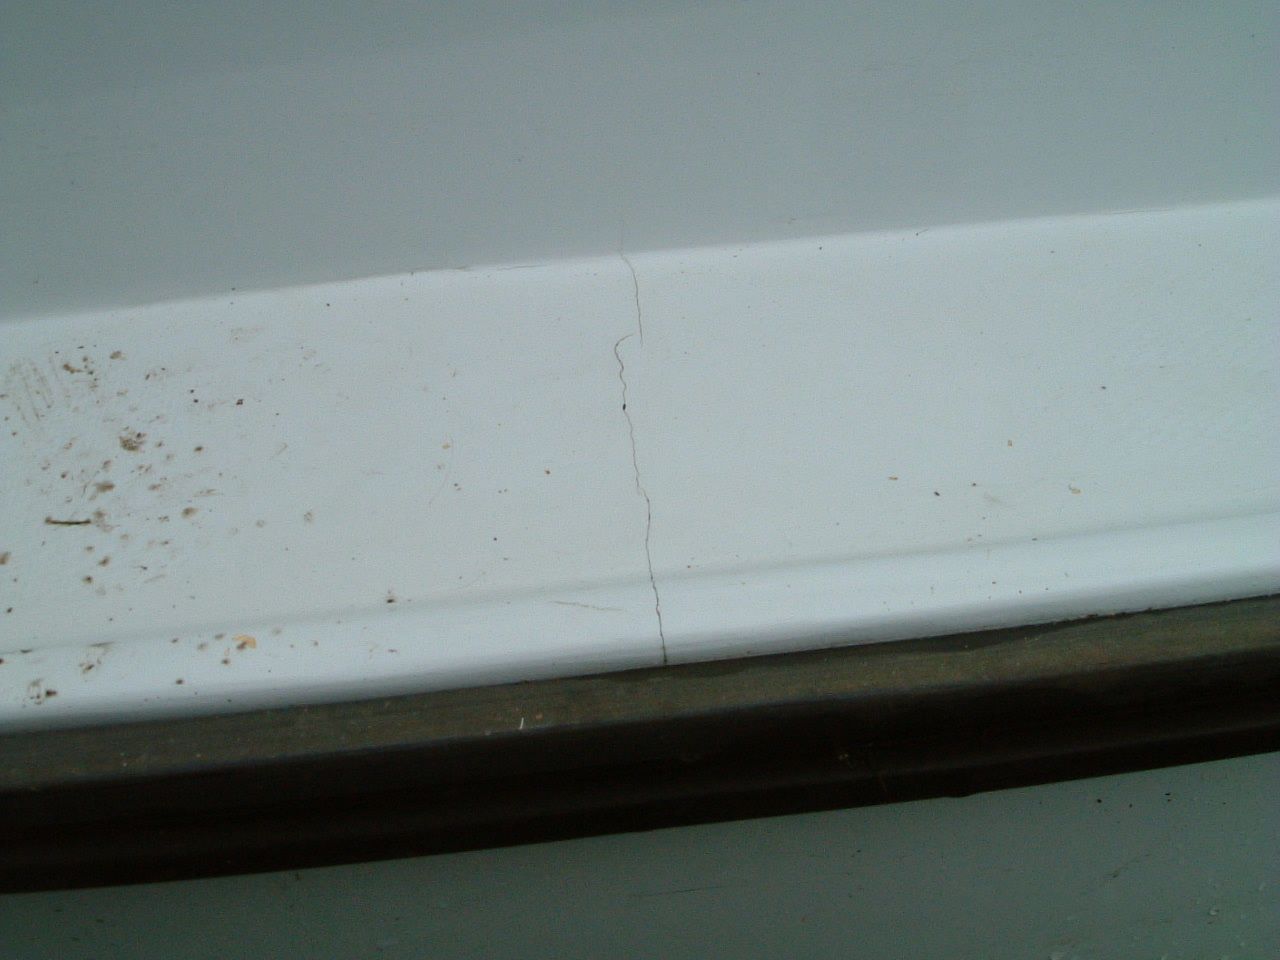
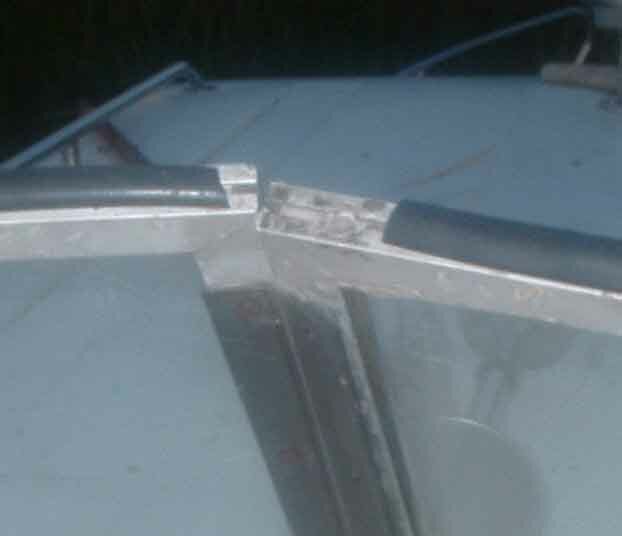
This from William
"I was wondering if you could give me some advice regarding a Norman 32 I looked at this weekend. The boat fits what I required exactly, (IE needs a total interior refit) the hull has been refurbished in recent years and all oily bits are in good condition. The problem arises when I noticed a crack in the super structure amidships, in fact plumb in the centre on both sides (please seen attached picture). Having spotted this, I have suspended the purchase to seek advice".

![]()
Not exactly a fixit but typical of what happens when we try and fit things!!
This is from Steve....
Trails and tribulations of fitting a new fridge
In 1987 I fitted an Electrolux RAM 24B fridge (similar size to the RM 122) into “Opal”. The fridge came from my parent’s caravan, which they bought, second hand, 10 years earlier. So this fridge was at least fifteen years old when I fitted it. I put it in a place where there had once been a stupid cabinet with shelves and glass sliding doors. You can see pictures of it in “Your Normans 3” almost at the bottom of the page. Over the years, I regularly fiddled around with it to try to make it work better, but in 2002 I fiddled once too often and almost killed my wife. We carried on with it that year but made sure the windows and doors were left open during the night. I measured the size of silly cabinet thing and decided I could fit a much larger fridge into the space. So in April 2003 I bought an Electrolux RM 6270, a proper fridge with an ice compartment big enough for more than just one ice try. In May, I took my new fridge up to “Opal” to fit it. First job, of course, was to remove the old one. No problem until I tried to get it out of the front cabin. I had to remove the cabin and fridge doors to get it out of the boat. But my new one is much bigger and I hadn’t thought to measure the door opening size. The door on an RM 6270 is not designed for easy removal but I eventually managed to take it off. I had forgotten to bring a tape measure with me so used a piece of wood as a measure. I removed the doorframe linings (which fell apart in my hands), cut lumps out of the bulkhead and finally got it into the boat. Now I fitted it into the available space and it just went in but, although I knew I would have to reposition the flue, I had no way of getting to the back of the fridge, to mark where to drill. So I ended up ripping out the silly cabinet, which in turn, destroyed the worktop and other fittings around it. My two days had now run out and I left “Opal” in a much worse state than when I arrived and would need at least a week to put it all back together. That year, as you’ll remember, was incredibly hot and the thought of working inside a boat in that heat was too much for me to bear, so in November 2003, I returned to “Opal” and put her away for the Winter. So in July 2004, I finally was able to take a week off work, and finish the thing so we could all go on a three-week holiday with our nice new fridge.
![]()
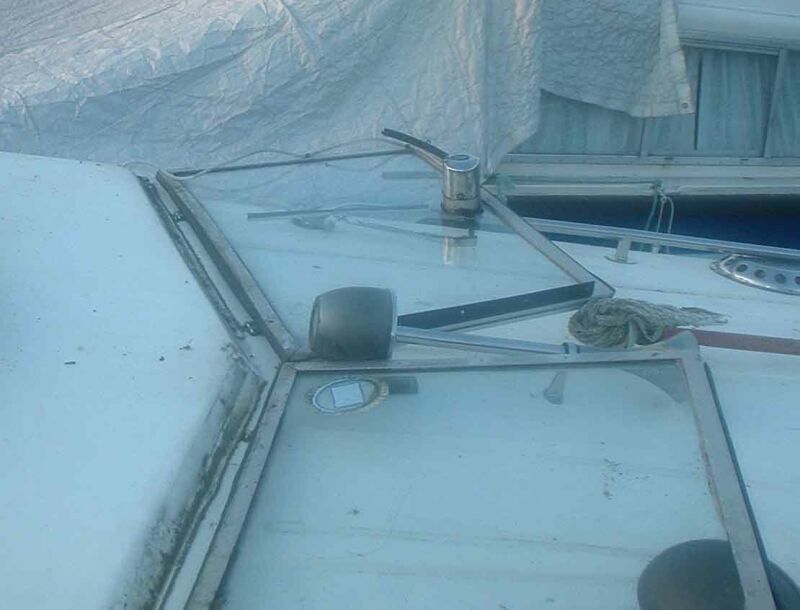
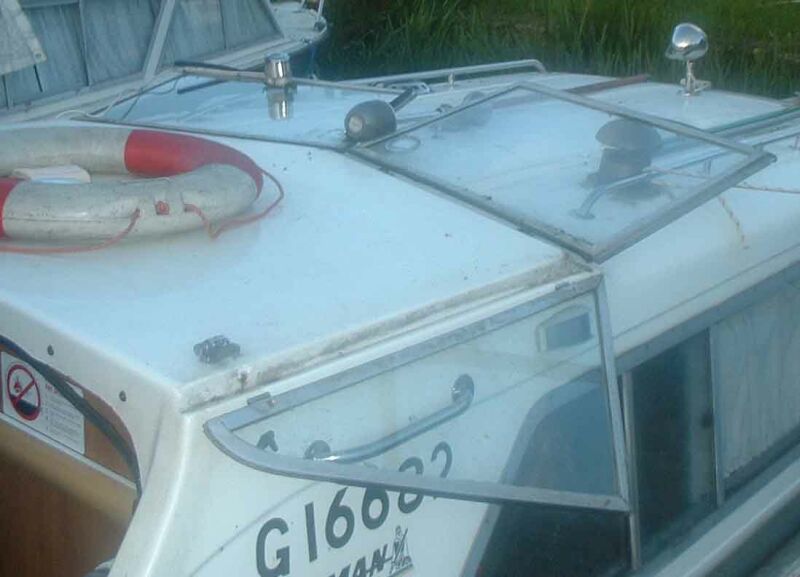
Here are Stuarts promised pictures of his hinged aluminium screen
![]()
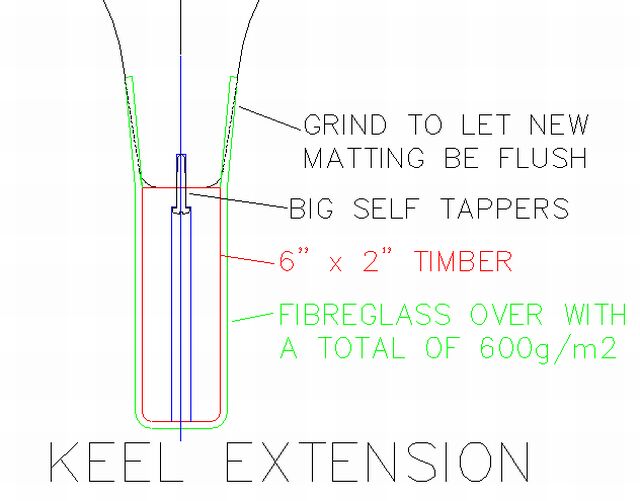
This is Simon's promised drawing of his suggestion for extending the keel!
![]()
AND FRED PRESENTS THESE
This cost me 70 euro to have made to the BSS regs and my dimensions, Hope this helps
![]()
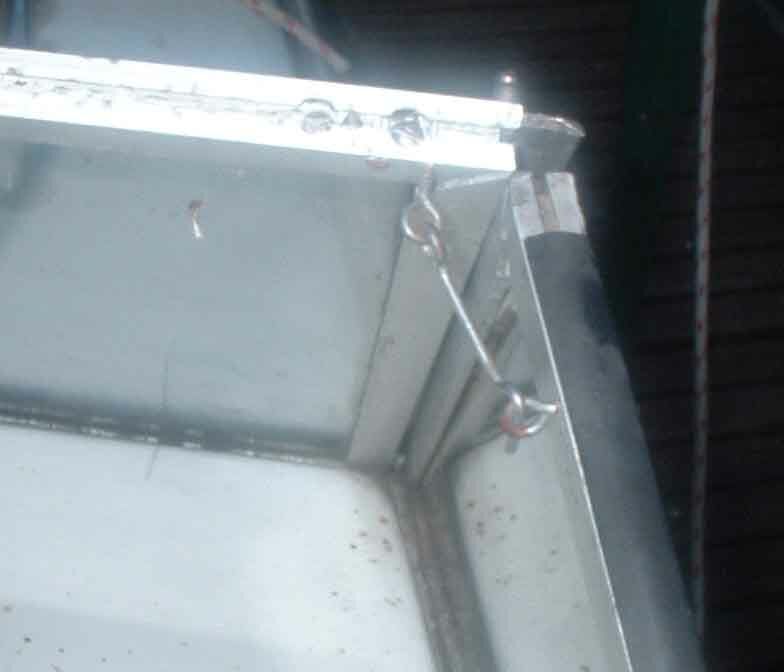
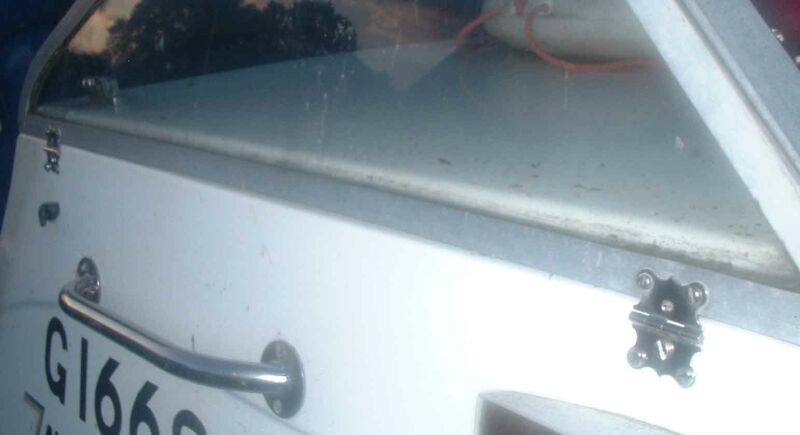
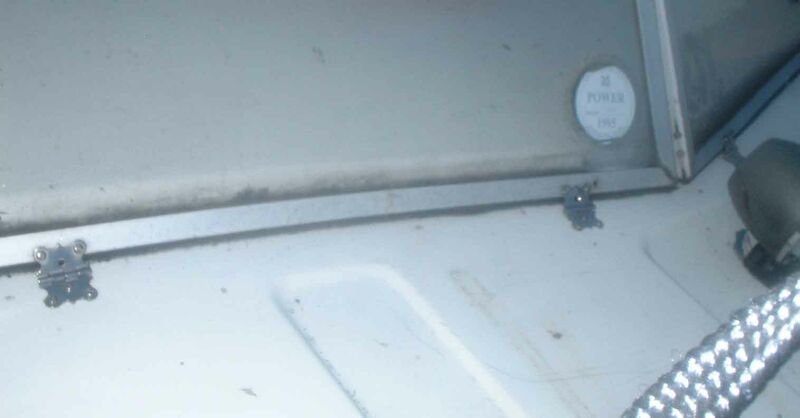
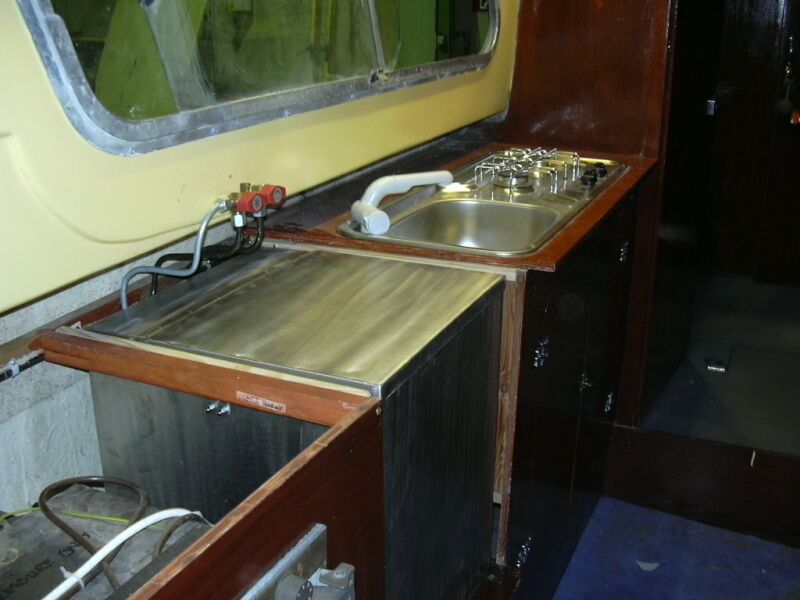
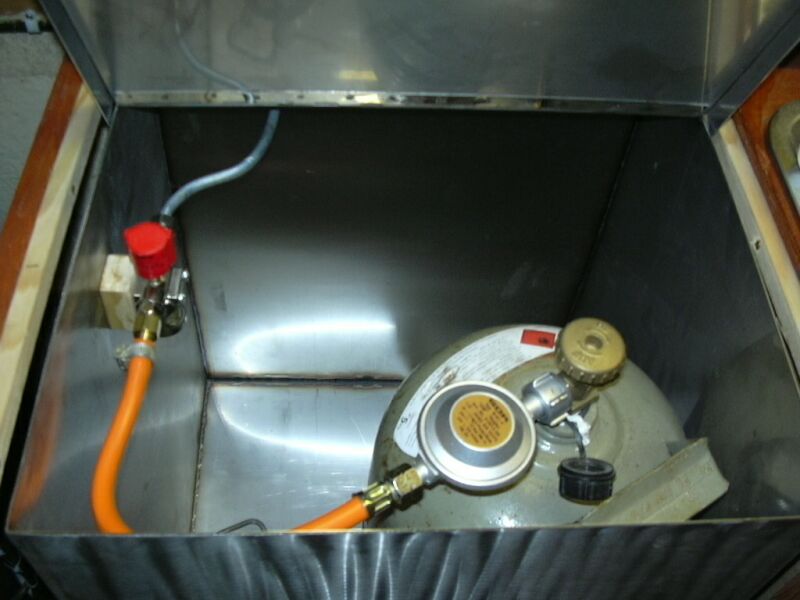
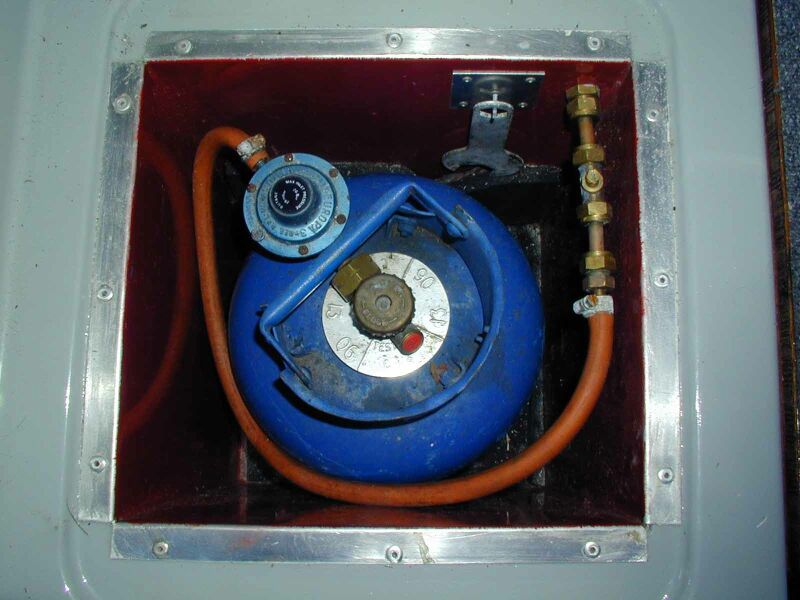
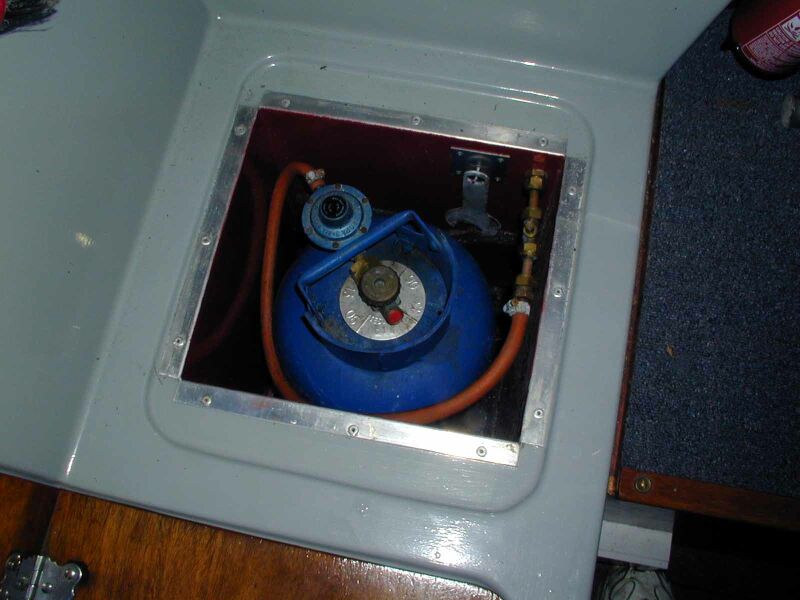
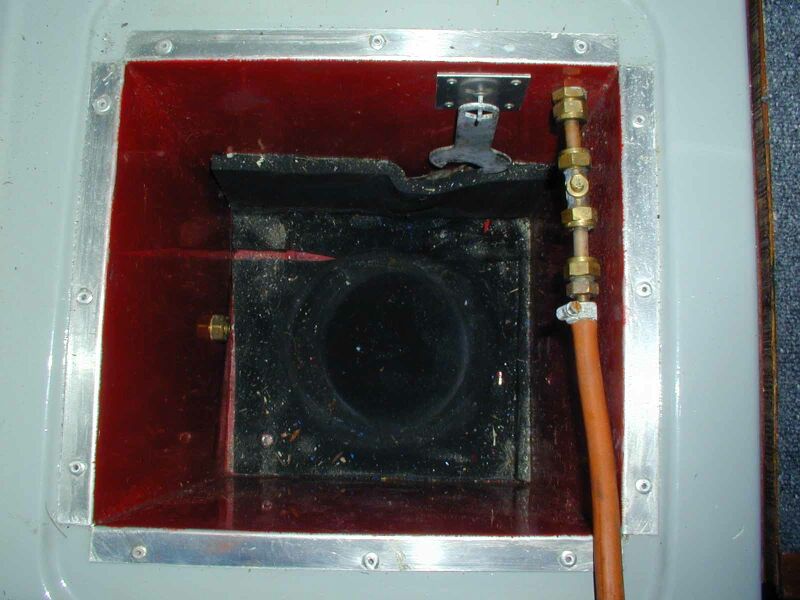
THESE FROM OLIVER
My gas locker is located on the port side & is made of aluminium, TIG welded to form an airtight joint. The drain vent at the bottom is about 4 inches up - according to the BSS examiner it actually should be lower but would then siphon river water back in. It exits at the stern through copper pipe & a shielded 90 degree skin fitting about 6 inches above the waterline. The locker lid is simply plywood. No restraining is necessary - in the empty pic you can just see the black foam which stops the bottle from banging about.
Trust this helps.
Regards - Oliver
![]()
TRAILER INFO
Do you know the rules when it comes to trailing your boat?
*Please be aware this article was written a long time ago and rules may have changed since*
Guilty! Take him away... That's what you hope and trust won't happen as a result of towing your boat to the water's edge. But being stopped by traffic police, charged, then convicted of some offence or other is a real risk - unless you stick to the law when trailing. To do that, you need to know something about it, which is where this potted ABC of towing law comes into the picture.
Note that it's a potted guide and as such can give you only an outline of the major points. Do not, under any circumstances, expect to be able to hold up a copy of Boat Mart in court as a defence should you be nicked! If you want to wave anything at the judge (who won't appreciate being waved at anyway) try The Road Vehicles (Construction and Use) Regulations 1986 SI 1078 (amended) and The Road Vehicles Lighting Regulations 1989 SI 1796 (amended).
What this trail boater's guide can do, however, is help you avoid the most obvious legal traps when towing. So here goes...
Brakes: Your trailer must be braked if its axle weight exceeds 750kg and/or fully laden it weighs more than half your car's kerbweight. If fitted, brakes must work properly
Breakaway Cable: One must be fitted which would immediately apply the brakes should the trailer become detached from the towcar while on the move. Unbraked trailers require a chain or similar which is attached to the back of your car to stop your outfit running away should the thing become unhitched from your tug.
Driving Licence: If you passed a driving test before 1st January 1997 your driving licence allows you to tow. Since then, new drivers have been limited to driving a vehicle with a maximum authorized weight (maw) up to 3.5 tonnes towing a trailer of up to 750kg including its load. They can tow a heavier trailer provided the combination doesn't exceed 3.5 tonnes in total and the maw of the trailer doesn't exceed the unladen weight of the towcar. To exceed those weight limits, a second, towing, driving test has to be taken.
Front Lights: If made after October 1991 your trailer must have a pair of white forward-facing reflectors. A trailer which projects sideways more than 400mm beyond the illuminated area of the towcar's front position lamp on that side must carry a forward-facing white light in the relevant area.
Gross Weight: An important term legally. So far as boat trailers are concerned it's defined in 'Construction & Use Regulations' as the sum of all the weights transmitted to the road by all the wheels of the trailer and of any weight of the trailer imposed on the towing vehicle. In other words, it's the weight of your trailer plus boat and any load carried in or on them.
Height: There's no legal maximum, but the law expects any boat trailer to be safe, secure and stable. The recommended ceiling is 3m or 1.7 times the trailer's wheel track
Indicators: They must flash in unison with those of the towcar and operate at a rate of 60 - 120 flashes per minute. There has to be provision for the driver to know of failure of any of the indicators on the trailer and towcar e.g. a dashboard warning light or a buzzer.
Insurance: While towing you must have third-party cover for your boat and trailer as well as for the towcar, which should be insured separately from your outfit. Common sense dictates that you should also insure against damage caused to the boat and trailer as opposed to being caused by it.
Kerbweight: An important term legally. It's defined as the weight of a car including a full fuel tank and a spare wheel plus any loose tools and other items normally supplied with the vehicle. It usually excludes the weight of the driver, passengers, towbar and luggage, but check your car handbook because there are exceptions.
Learner Drivers: Holders of provisional driving licences may not tow trailers under any circumstances
Lightboard: It should be no more than 1.5m from the ground, or 2.1m 'if the structure of the vehicle makes this impracticable'
MAW/MGW: Two important terms legally speaking. MAW (maximum authorised weight) is the total permissible weight of a trailer or car including its maximum load. MGW (maximum gross weight) is similar but has been defined as the total unladen weight of the trailer or car plus the maximum payload that it's designed to carry: exceeding that is illegal.
Mirrors: The law requires that the driver of a towcar should have an adequate view to the rear. If there's no rear view when you're towing it may be necessary to have special towing mirrors fitted. Any rear view mirror mustn't project more than 200mm outside the width of the trailer/boat when being towed or the width of the towcar when driven solo.
Mudguards: Mudguards, or similar, to cover the wheels of the trailer are essential
Number Plate: Generally speaking, the registration mark of the towcar must appear on a prescribed number plate on the back of the trailer when it's being towed. The number plate must be identical in shape, colour and characteristics to that on the towcar. Handwritten versions are illegal. When driven solo, your car's number plate mustn't be obscured by the towbar or anything else.
Outboard Motor: Anything that projects from the boat or trailer, especially if it has sharp edges (like an outboard or sterndrive), must be protected so as not to endanger anyone. That means placing a reinforced plastic bag or bucket, preferably brightly coloured, over it.
Parking: If you park your boat trailer on a public road it must be properly immobilised (a handbrake, chain, wheel chock or similar). Between sunset and sunrise it must also be adequately lit all round (including the number plate and, despite the absence usually of position lamps there, at the front). You cannot legally park your outfit in two adjoining parking meter bays or the trailer itself in one. Parking your boat trailer in your front garden may require the approval of the local authority. You should have no problem using the back garden, but check your house deeds or lease first just in case.
Passengers: It's fine to carry some in the car, but nobody may travel in a boat while it's being trailed.
Rear Lights: On the back of the trailer there must be a pair each of red marker lights, red stop lights, triangular red reflectors and orange indicator lights plus white number plate illumination and at least one fog lamp
Roads: While towing your boat you're usually prohibited from using the outside lane on three and four lane dual carriageways and motorways, assuming all lanes are in service.
Side Reflectors: Trailers longer than 5m excluding drawbar should, depending upon length, have at least one pair of orange side reflectors.
Speed Limits: When towing you're restricted to a maximum of 60mph on motorways and dual carriageways and 50mph on other roads. A towcar-trailer outfit with a combined maximum gross weight of more than 7.5 tonnes is limited to 50mph on dual carriageways and 40mph on other roads. No speed stickers are required on the back of your trailer.
Towing Bracket: Generally speaking, cars registered since 1st August 1998 are required to be fitted with a 'Type Approved' towbar meeting the requirements of EC Directive 94/20.
Tyres: Cross-ply and radial tyres on the same axle are prohibited, although either type may be used on their own irrespective of the type fitted on the towing vehicle. There must be at least 1.6mm depth of tread throughout a continuous band comprising the central three-quarter breadth of tread and round the entire circumference of each tyre. They must be suitable for the purpose for which they're being used, inflated to the correct pressure and free from any dangerous defects. Space-saver (temporary use) wheels and tyres may not be used.
Weight: Generally speaking, the maximum laden weight of a trailer which has a parking brake and automatic overrun brakes is 3.5 tonnes. Unbraked boat trailers must have their maximum gross weight marked conspicuously on the nearside. The Department of Transport recommends a plate showing gross trailer weight, model, maker's name and address and the unit's serial number. Maximum towing weights quoted by car manufacturers must never be exceeded: do so and you invalidate any warranty and also lay yourself open to a charge of driving an unsafe vehicle. You may come across the term 'train weight'. This is the maximum permitted combined weight of the towcar and the trailer with boat, as specified by the motor manufacturer.
Width: The trailer mustn't exceed 2.3m in width. A boat may project up to 305mm each side from its trailer so long as the total width doesn't then exceed 2.9m. If it does, the police must be informed in advance and special marker boards fixed in certain positions. The maximum permitted width of the boat is 4.3m.
Your Car: We've assumed that you drive an 'ordinary' car i.e. a motor vehicle with an unladen weight or kerbweight not exceeding 3,050kg and a maximum gross weight (mgw) of up to 3.5 tonnes and/or with up to eight passenger seats in addition to the driver's. Different rules may apply if it's larger.
Courtesy of Philip Pond and
![]()
![]()
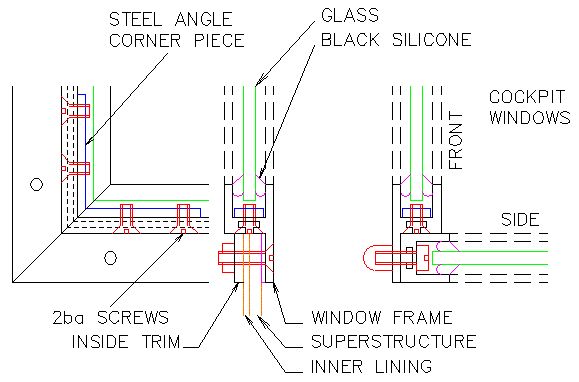
Re-building Norman aluminium framed windows.
(Thanks again Simon)
Mk.3 Norman 23’s have aluminium framed windows made from extruded ‘h’ section with mitred corners. The corners are held together with fitted steel angle pieces screwed to the aluminium with steel screws. The glass is sealed into the frame with rubber ‘u’ section. If the glass or sealing section needs replacing the whole frame needs to be dismantled to put the new materials in. If the sealant is leaking the steel will be in a particularly bad way, the screws will probably rusted solid and will need to be drilled out.
Take out the window, you can save the brass countersunk screws or replace with stainless steel, they are 2ba but you could use 5mm. Before carrying out any dismantling, get a large piece of paper or card and draw around the whole window and mark the aluminium frame sections to identify them later. I used [PTL], meaning [P]ort side window, [T]op [L]eft, etc, marking each end of the 4 pieces of frame. Use a permanent marker on the inside face of the bit that bolts against the boat. On the inside of the boat there is a 4 piece ali frame for the nuts to tighten up against. As you remove them, mark these also for future identification. The 4 pieces are unique so you wouldn’t be able to get them in the wrong place, but it does make life easier.
Clean everything up, throw away the window seals, steel screws and angle pieces, they are probably all useless anyway. I made new angle pieces from steel plate, but should have used ali or brass to make a rust-proof job. I used new brass 2ba countersunk screws to fix the angles to the frames. Cut strips of plate about 4” long so they are a nice fit in the window slot. Mark the middle and bend to suit the angle of the corners, check against the card outline drawing you did. Find a piece of flat ply or something you can clamp the frame pieces to. Lay the frame pieces over the card drawing on the ply and clamp 2 pieces down forming a tight corner. Put the angle piece in the slot and mark the position of the screws. Drill and tap screw holes a fraction towards the apex of the angle, not directly where they should be. This makes the frame tighten up as you finally screw everything together. A simple trick to do this, instead of putting the angle directly up against the ali frame, put a strip of thin card in first to make a spacer. Once the 4 corners are done, test tighten it up without the spacers and check against the card outline drawing to see if the new frame is as ‘square’ as it used to be. This ensures that all the frame bolt holes line up. Remove one side and slide the glass back in, you may have to shorten some of the corner angle screws. Find some card, wood or metal strip that is the same thickness of the old sealing ‘u’ section. Put these strips between the frame and the glass. Using black silicone sealer, squeeze in the new sealant and smooth off, much easier than trying to obtain the correct size 'u’ section. Let this go off, turn the window over, remove the spacer strips and apply silicone. When this has gone off, the window is complete. I bought black silicone sealant from the glazier that I bought the new toughened glass from, they use black silicone where they cant fit the rubber trims back in on double glazing. I paid £4 per tube, much cheaper than ‘marine’ silicone!
This shouldn’t be beyond anyone that has basic DIY stills, but does require tools, such as a thread tap, a drill and drill bits, hand saw, bench vice, etc. I am lucky in having an engineering workshop at home, but you may have friends that work in engineering that could help do the workshop bits.
These instructions also apply to the top cockpit windows. All but 2 sections are ‘u’ section ali rather than ‘h’ section. The corners are fixed in the same way.
![]()
Osmosis?? Don't Panic !!
Thanks to Simon for the following words of wisdom.
Osmosis is a
form of blistering normally only found on the underside parts of GRP boat hulls.
Its appearance is random and it affects only a proportion of GRP boats, but
sufficient in numbers to have caused considerable concern and precipitated
(often unnecessary) very expensive treatment to remedy. The cause is invariably
some deficiency in the production of the original
laminate (e.g. using unsuitable resins, working in poor conditions, or faulty
lay-up work, etc.), generating voids which are filled by free styrene. No resins
are completely waterproof, they all absorb a certain amount of moisture in time.
Subsequent penetration of moisture into these void areas can then build up
considerable pressure, lifting the gel coat in the immediate vicinity into a
blister.
Whole areas of blistering may occur, but not because the 'disease' is spreading
like measles. it will only occur on areas where the cause is already there, and
develop into blistering over a period of time. The effect, however, is often
exaggerated. Small blisters which appear and then do not grow any more are only
a cosmetic defect. They will not have any effect on the strength of the laminate
or on the protection provided by the gel coat, unless very widespread and
densely located. in fact blisters less than about 5mm diameter are best left
alone. No remedial treatment is necessary unless there are cosmetic reasons
(which are unlikely on a part of a hull normally not seen). Some osmotic
blisters, on the other hand, may continue to grow in size. The blister skin of
gel coat is then very prone to be broken, exposing the laminate below to water
penetration. Thus blisters which are broken, or large blisters which can easily
be broken (e.g. with fingernail pressure) need remedial treatment. If there is
an obvious cavity, treatment is certainly necessary, as this will probably show
as an area of 'dry' glass which will readily absorb water and draw it into the
laminate. Treatment involves removing the unsupported area of gel coat (the
actual blister), thoroughly washing out and drying the cavity. The whole cavity
can then be refilled with epoxy resin stopping compound. (Polyester stopping
compound can be used but is not as good). After hardening this is flattened down
and a final coat of epoxy paint applied over the area. There is another type of
blister which can develop. It is broad and flat and not always spotted unless
viewed from along the surface of the laminate, or detected as a raised area when
a finger is rubbed over it. Actual size of the affected area may range up to
50mm diameter. in this case the void
causing the trouble is located in the laminate itself, not just under the gel
coat, and there is no thin blister surface which can easily be removed. The
whole area needs to be dug out to expose the extent of the void which, after
cleaning and drying, needs to be filled first with matting and resin to rebuild
to the full thickness of the laminate, followed by epoxy stopping compound for
the final surfacing. Large blisters of this type most certainly need remedial
treatment when detected for they can continue to grow under osmotic pressure and
weaken the laminate itself.
![]()
Fibre Glassing is Easy !! Simon says
Fibre glassing
is easy, I know because I did it without being taught. But I did read a bit
about it first! To make fibreglass you will need polyester resin, catalyst,
matting, application tools and p.p.e. Polyester resin - thin treacle that smells
of chemicals, the smell is styrene. This is the stuff that eventually sets hard
and brittle, but the matting gives it its strength. Everywhere I've read says
that normal resin doesn't go off until the air is excluded so the last coat
needs wax adding to allow it to dry. My experience doesn't agree with this, all
the resin I've used goes off hard and dry. The topcoat stuff is called flocoat
and is used to paint over everything that has been fibreglassed. It is useful
for tanks and such thing as fishponds where you need to seal the chemicals in.
Catalyst - looks like water but smells nasty because it is! Contains peroxide so
causes burns, I've got a few. Accelerator comes under catalyst but is usually
already in the resin, check that the resin is 'pre-accelerated'. Matting - very
thin strands of glass that is held together somehow to form a material. The
strands can be 2" long in a random pattern of bundled up strands held together
with a substance that holds them all together until the resin soaks it up to
allow the strands to flow about in the resin. This matting is called 'chopped
strand mat' or CSM. Available in different thickness's, best to go for 600g/2oz.
Matting can be long lengths of glass that is woven, this is woven rovings,
normally used between alternating layers of CSM for making thick strong
mouldings, like hulls. Matting on its
own is weak, so is resin. Put them together and each one supports each other to
make a strong but flexible substance. Application tools - cheap paint brushes or
medium piled rollers. All you want to do is shove the resin into the matting
without initially shoving the
matting about. Dabbing with a brush or rollering does this nicely. All the
instructions that I have read say to stipple with a brush, but this takes ages
and gives messy results. Once the matting is full of resin, you can then gently
move the matting about to co into corners, etc. Also under tools, sandpaper and
Acetone for cleaning areas to be fibreglassed. Acetone cleans unhardened resin
from anything, but I use cheap brushes so throw them away once hard. Something
to mix the resin in, I use plastic milk bottles
cut to about 4" tall, when empty the hard resin can be pushed out to reuse the
pot time and again. PPE - important as fibreglassing 'can' be dangerous,
catalyst in the eyes is harmful, have some eyewash nearby, catalyst on the skin
burns, wash off immediately. Even matting isn't nice, just like loft insulation
it makes you itch terribly it the tiny strands come in contact with the skin. I
use disposable latex groves if I'm going to use brushes for the resin as you
have more feeling, or mariolds for rollering and heavy duty brushing. I put
goggles on when doing anything with the catalyst, once it is fully mixed into
the resin I dont take them off. If you have just used the catalyst, dont touch
your face as I did, I scratched my lip and I now have a burn mark
that is always dry.
To mix, put required amount of resin in pot. As a guide, 1 square metre of 600g
matting will need 1.5 kg of resin, roughly 1.5 litres, so do 3 x 1/2 litre
mixes. DIY'ed fibreglass matting will need 2.5 times the weight of matting used,
proffessionals can use less. Measure 1% catalyst, I use a proper squeezy bottle,
it has a measuring tube on top which you squeeze catalyst up into and then pour
into the resin. Mix well getting into the corners. I normally mix 500ml resin so
use 5ml catalyst. This gives about 10-15mins before it starts to go off. If you
are doing a lot, mix another pot quickly when the first is used up so you can
keep using the same brush! If a mix starts to go off in the pot put it outside
as it can get very hot.
A simple project for us boaty types is a water tank. Any free space can become a
tank, wait 'till you see Snapdragon! I've got 125 gallons of available capacity
but I don't have to fill them to the top! I intend to make full use of my
luxurious shower compartment.
To make a tank, find somewhere for it to go, think about where the access lid
will be, and cut 9 or 12mm ply to create the sides. If you have the tank near
the hull side, the hull side can become 1 or 2 sides of the tank (side and
bottom!). Hold the sides in place somehow where the tank will be, and tack in
place with small strips of matting. For tacking, I paint resin onto glass and
lay a piece of matting on the resin, pushing more resin into the matting until
it is swimming. I then lift the wet matting off using the brush and fingers or
other tool and push it into place where the tack is needed. Do all of the tacks
to complete the open box. The wetted out 'tacks' can be used for joining
anything to the hull, I use them a lot as it is hard to put resin onto matting
that is unsupported. When hard, cut matting to size to complete the corners, and
pieces to do the sides. Mix some more resin and thickly paint it everywhere
matting will eventually go. Put corner strips in place and paint on resin. Do
all corners, then put bottom and side pieces in place and paint on resin. Leave
to go off. Cut ply for top, make hole 5" smaller than tank width and depth, this
gives you a 2.5" flange for
fixing the top down. Radius the cut-out sides so they are a 'D' shape, the
matting will then bend around easily. Cut matting to size to go from an inch
down from the top on the side, going round the flange top, round the corner,
under the flange and down the side again to create the seal for the top corner.
This piece is sometimes hard to do as gravity keeps pulling it down. Put top ply
in place and tack on outside, leave to go off. Paint resin on again where the
matting will be and starting from the outside, work your way around to the
inside. Push some strands about to form an overlap at the corners, this way you
don't end up having a bulge where the matting overlaps. If you find somewhere
that has no matting, say in corners, cut squares and wet out on the glass. Lift
them up with the brush and stick in place. When it is dry, you have a tank with
no lid. For inlet and outlet connections for pipes and vents use any
non-corroding pipe that your flexible pipe will fit onto. I use copper, but
brass, stainless steel or even plastic is better. Drill holes for pipe, sand
pipe to key it and stick in with resin and matting. Cut ply for lid and
stick a layer of matting to the side where the water will be. Once tank and lid
are dry sand to get rid of sticking out fibres and bumps. Make the lid 4" larger
than the hole all around for a 2" overlap. Drill lid for 5-6mm stainless bolts
and drill through into tank top. Glue bolts in from inside the tank using epoxy
(araldite). Now paint lid and inside tank with flocoat sealing around the bolt
heads and pipe connections. Leave to dry for a week then wash out thoroughly.
Now put a thick bead of silicone sealer around the flange (between the bolts and
the hole) and push
lid into place. Lightly tighten the nuts over washers and your tank is done. If
you make the flange top thick enough you could use brass woodscrews to fix lid
down, but don't drill through into the tank! Bolts are a better choice. When you
get reasonably good it takes less time to do that I have took to explain! If you
look at the photos 48-51 on my Snapdragon page, photo 50 is a tank like I've
just described. The mirror in the photos is to check where the fibreglass is
going
![]()
OIL LEAKING FROM OUTER GEAR SELECTOR SHAFT ARM ON A ENFIELD LEG .HOW DO YOU FIX IT ? HOW MUCH WOULD THIS COST IF A MARINER WAS TO DO THE JOB (GUIDE ONLY)
What you need to do is:
1. Drain oil.
2. Remove gear lever and key from gear shaft. VERY IMPORTANT - Use some emery
cloth and smooth any rough edges.
3. Remove circlip and nylon bush.
4. Remove bolts around gear selector plate
5. Slide gear selector plate off, being careful not to lose captured spring and
detent piece down inside of leg.
6. "O" Ring on gear lever shaft (or inside of plate) to be replaced.
7. Paper gasket round selector plate to be replaced with new gasket and thin
smear of blue Hylomar.
8. Re-assemble
The cost of the parts are around £8 including carriage from Bob Knowles. Also
worth while getting is the leg manual with exploded drawings, this makes it all
very easy. This costs about £5.
It took me a morning to do this job, so I reckon a marina would charge £200
labour plus parts.
Courtesy of Tom Carnell.... thanks Tom!
![]()
How To Bleed Your fuel system on an inboard
diesel engine
Often, engine starting
problems, are caused by small amounts of air in the fuel. A common cause of
this problem is when you run out of fuel, if this happens you will need to know
how to "bleed" your engine, which rids the fuel lines of air, so the engine can
start.
If you are an owner of a
diesel engine bleeding is an essential skill. If you are familiar with the
manufacturer's recommended procedure for bleeding your engine, follow it, but
generally, the procedure is as follows.
When bleeding the fuel line,
especially when the starter motor is used to operate the fuel lift pump, wrap
rags around all venting units to collect excess diesel fuel that splashes out.
MANUAL PROCEDURE
Open the fuel supply valve, (usually located near the fuel tank this is the on/off switch) and use the manual fuel pump (found on most diesels at the side of the engine).
·
Loosen the
connection points (bolts) at the top of the injectors.
·
Pump the
fuel into the lines.
·
Do this
until you just see fuel bubbling out of the bleed nipples of:
1.
The secondary filter (diesel filter-usually located on top of the
filter housing)
2.
The fuel injection pump (located on the side of the engine –follow the
fuel pipes down from the injectors)
3.
The connection points (bolts) at the top of the injectors.
(The process is similar to
bleeding your central heating radiators)
·
Try to pump until you
get clear fuel without bubbles from each fitting. If you succeed, and there is
no longer air visible in the fuel system tighten each connection in turn.
Starting at the filters, then at the pump and then the injectors.
·
If you are fortunate
enough to get all the air bubbles from the fuel, flowing out of each and every
injector your ready to start your engine. Make sure all bleeding points are
tight before trying to start your engine. If you are still having problems try
the following.
MECHANICAL PROCEDURE
Expel air from the
filter, then the pump as in the last paragraph. Make sure that all the injectors
are tight in their bases and all of the fuel line connections at the top of the
injectors are loose, this will allow the fuel and air to spurt out of them when
the starter motor is engaged.
Have the correct size
spanner in hand, ready to tighten the fuel line connections when the fuel runs
clear without air bubbles.
·
Now,
turn the engine over with the starter motor, and with the throttle open.
·
At first
you should see fuel and air bubbles coming from the injectors.
·
Look at the number one
injector. (Check your manual for guidance)
·
When it
shows clear fuel with no bubbles, tighten the connection and look at the second
injector.
·
Again,
when it shows no air bubbles in the fuel, tighten it and go on to the next one.
·
Continue
this process until all injectors are cleared of air.
Your engine may start
before all the injectors have been tightened. This is completely normal so
don’t panic. Just release your pressure on the starter button or key and let the
engine run while you continue to monitor the fuel flow from the remaining
un-cleared injectors.
·
Do not
crank the starter motor for more than
30 seconds
at a time, as this will cause wear on your starter
motor.
·
WARNING
This method can cause the battery to become flat whilst
the engine is ‘wound over’, so
CARE should be taken.
As an alternative to using
the starter motor you can also put the decompression lever in its decompressed
position and hand crank the engine to move fuel to the injectors. When all
injectors are cleared of air and their fuel connections tightened down, you are
ready to start your engine.
·
In all cases
Don't over tighten
the nuts, and it is always prudent to check for leaks when the engine is
running.
·
When the engine is
running look at the exhaust if it is “puffing white smoke” this is a sign that
air is still present in the fuel – keep the engine running and if this doesn’t
eventually clear, re-bleed injectors whilst the engine is running.
![]()
Dave gives the following hint :-
Curing Low speed wandering of Norman 20
The only solution that worked for me was to make 2 plywood trim tabs about 12in by 3in and fit them on the transom with about 12degrees down angle. I fitted them level with the hull bottom, with the outer edge level with the hull side. The boat now goes straight without having to make constant corrections. Previously Rudder extensions had also worked, but made the steering too heavy. Hydrofoil wings helped only very slightly.
![]()
TERRY WANTS TO KNOW
About the insides of a rear cockpit 18 or 20. Anyone who can help or show him some pictures please email him on the link below.
![]()
![]()
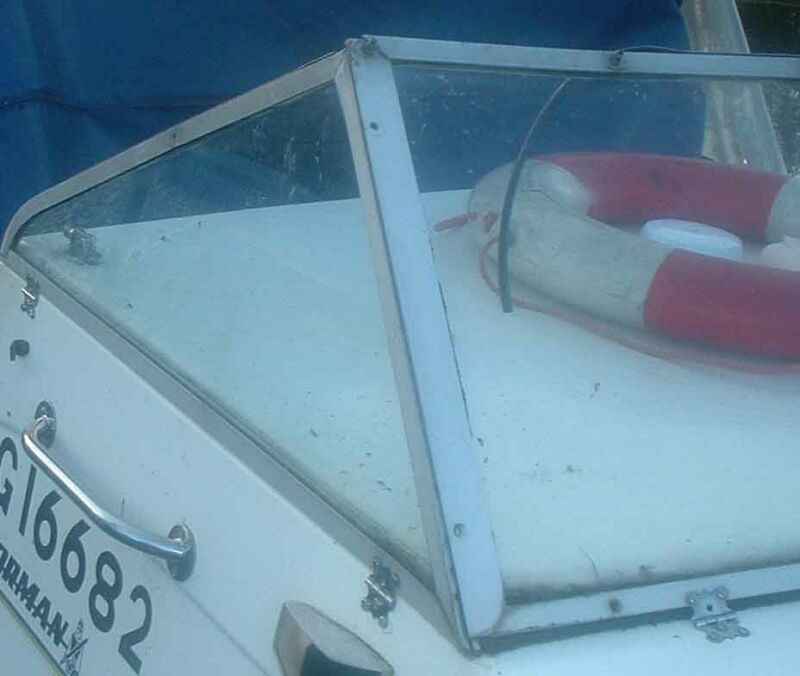
KEN ASKED
We have a Norman 23 with the original
GRP windscreen. Can anyone advise us where we can get a replacement aluminium
one?
RESPONSES
![]()
MARILYN ASKED
Can anyone tell me what type of hull the Norman's have. Being a virgin boater I am learning all the time and during my search for info on ballast I have come across planing hulls, displacement hulls semi-planing hulls etc. What is the hull of my Norman like, why is it called that and what design features does this type of hull have? ie advantages and disadvantages. Cheers guys I am sure one of you will be the man who can!
And this appeared from Andrew !!
RESPONSES
There are three basic hull types for motor
craft, displacement, semi-planing/semi-displacement and full planing.
For inland waterways purposes the displacement hull is the most important type.
This type of hull moves through the water, pushing the water aside as it does
so. The maximum efficient boat speed is a factor of the hull length, assuming
that the bow is reasonably pointed and that the stern is also reasonably
pointed, or at least has no sharp step anywhere (naval architects wishing to
discuss the advantages of transom sterns on high power displacement hull forms
may do so off list!), the object being for the water to flow smoothly around the
vessel. A classic narrowboat is an excellent example of this, as is the Norman
32. The hull may have a keel to aid directional stability, this keel will be
full length or nearly so. Driving the hull faster than hull speed requires a
disproportionate amount of power, but hull speed can be managed with quite a
small engine, hence the large number of 9.9 and 15 HP outboards powering boats
25 or so feet in length, or steel narrowboats weighing 10 tonnes powered by 20HP
twin cylinder diesels. Displacement hulls like large propellers turning slowly
as this cause less water turbulence. To go above hull speed tends to result in
wastage of fuel, bigger wash, more noise and no real speed increase.
Semi-displacement hulls are neither fish nor fowl. With lower engine power they
will act like a displacement boat, smoothly flowing water and little wash. With
increasing engine power the semi-displacement hull may begin to rise out of the
water and start to plane but will not have a very high planing speed by
comparison to the full planing hull using the same power. The Norman 20 and
Conquest are good examples of this sort of hull, a reasonably fine entry
forwards, a medium to smallish keel for directional stability at canal/river
speeds and a flat area of the after third of the bottom to give lift when
planing. The 20 and Conquest are quite happy with a 9.9, or maybe a 15 if you
plan to do much river work, but will take up to 80 HP on the transom and I am
aware of one with a 120HP diesel in the cockpit, and a top speed the
irresponsible side of 30 knots! My own Conquest had a 35HP engine, too much for
the river but useful on the Tideway. Semi-displacement hulls have the good
points of displacement with some of the speed of full planing, or alternatively
are roomy, slow planing craft or cramped displacement ones!
A full planing hull has a sharply V shaped hull and no significant keel,
together with the flat section aft, extending to up to half the hull length. The
boat is designed to rise onto the surface of the water once travelling fast
enough, the water resistance suddenly reduces and you are off, wash and all! At
slow speeds they are pigs to handle accurately due to the lack of any keel and
the small rudder, which is kept small to reduce drag at speed but makes for
exciting handling in the marina! Full planing hulls like small high speed
propellers to reduce drag.
The displacement hull allows for the maximum internal space and the maximum
stability, the full planing hull is pretty much the opposite!
You may also want to consider the Recreational Craft Directive from the EU.
Ignoring the waffle over maximum crew and requirements for handbooks there are
some sensible bits in it too. The RCD classifies boats into four categories, A,
B, C and D. A and B are of little interest to inland and river cruisers, being
Ocean-going and Offshore respectively, expecting to cope with winds of F8 or so
and significant wave heights to match. Category C is for coastal waters up to F6
with a significant wave height of a meter or so, and category D is for sheltered
and inland waters with no more than F4 and a wave height of 0.3m. The RCD came
in long after Normans went out of production but it is worth commenting, based
on observation, that the whole range would get an RCD D category except the 20
and Conquest 20 which might have got a C by virtue of their ability to carry
large engines and travel faster than most. Only might, because a significant
part of the testing relates to stability and unless Trevor wants it I don't
propose to talk about Angle of Vanishing Stability and metacentric heights here,
that's Yachtmaster stuff:-)
As for hull speed at displacement speeds, this is also dependant on precise
form, but 1.3 times the square root of the waterline length is a good starting
point for the most economical speed, in knots if you use feet and inches.. So
for the Conquest, water line length about
18.5 feet the hull speed is about 5.5 knots, around 6mph. I've tested this by
GPS and know it to be pretty much the case! Its also faster than 4mph so watch
it.
Hope this helps.
Two beers please: my friend will pay.
![]()
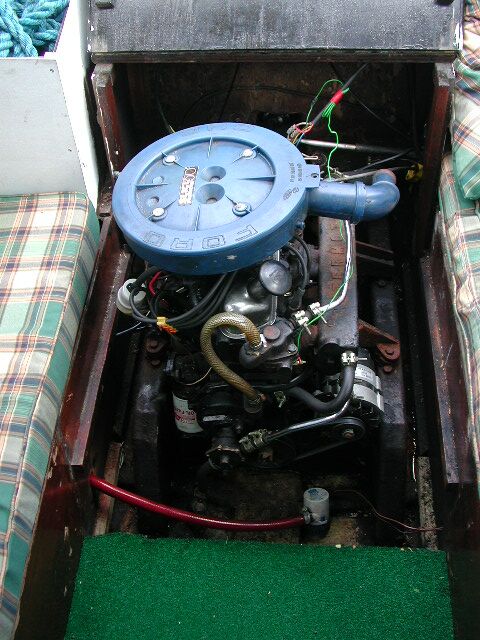
TRYING TO FIND A TIMING BELT
I have a boat with a ford transit
diesel engine 2.4 litre . Where can I buy a new timing belt from ? it is 71-84
year
belt 1170mm long 25.4 wide and 123 teeth?
I am in Australia so email would be best
![]()
RESPONSES
![]()
WANDERING NORMANS
If you have wandering problems on Norman 23,
HINT
Fit FX PRO foils, they have winglet
tips these act like rudders, also 23 were rated to 100 hp motors and are planing
hulls. My boat is powered by 35 Johnson t/stroke managing 6 knots on Lough Earn
in N/Ireland any less power and she would be going backwards.
![]()
ANTIFOULING
Hi, My Norman 20 is beginning to look a bit tatty and could do with a lick of paint and the hull scraping and antifouling, does anyone know how I go about this and what I need to buy, oh and a rough idea of cost would be gratefully appreciated. Thanks. Richard
RESPONSES
1. Antifouling is
straight forward but a bit of hard graft. The easiest way is a high pressure jet
washer first and this will take off most of the old stuff. Then rub off any
areas that look particularly rough and ropey. Now's the time to do any repairs
if needed. Use a mask when doing anything with antifoul.... its copper content
makes it unpleasant on the lungs !!! If you are just on the canals and rivers
you will need a fresh water antifoul, I used International Waterways which is
around £40 for 2.5 litres. Put this on with a small paint roller and wear gloves
and a mask. They say two coats for best protection but I was advised that by
using a roller I got sufficient coating with a single coat and it does look well
when done.
As for the "painted" part of the hull, lots of rubbing and flattening the
existing coat, gel coat filler for cracks and scratches... rub some more and
then, depending on the previous paint, a couple of coats. If you have any doubts
at all as to what the previous type of paint was use a single pack paint such as
Brightside. Twin pack paints can only go on top of the same. Again I used
International, this time Brightside which gave an excellent finish. I actually
did the painting before the antifouling. Seemed sensible and easier. Brightside
is about £13 - 14 per litre and I used almost 5 litres on mine.
After all that I put a really good coat of "Mer" polish over which improved the
finish even more and reduces weather staining also making it easier to clean.
Good luck with it...... Trevor
![]()
CAPACITY OF ENFIELD 130 Z DRIVE
I have a Enfield 130 z drive on my boat and I have been told fords
1.8 td engine is a perfect match what I need to know is whether fords 2.5di
engine out of a transit van would be ok
I know the 1.8td engine produces 75bhp does anyone know what the 2.5di transit
van produces
I would be grateful of any advice
Martin
RESPONSES
I
am wondering why you want to use the 1.8TD engine in a boat - unless operating
at medium to high revs - surely the normally aspirated engine is a better bet.
Although I'm generally not a fan of belt driven OHC engines in a marine
environment (we ask a lot of a bit of rubber) the 1.8 Ford diesel is a fairly
robust unit. Change the cam belt and injection pump belt EVERY YEAR no matter
what the service guidelines are in an automotive environment. Watch the later
engines - some use plastic guide rollers and some twin tensioners (manual and
automatic) which should be changed if in the least bit suspect. Better still,
Goodyear do a timing belt kit for all these engines which includes belts,
tensioners and rollers. The 2.5DI is probably the best small diesel Ford have
made (there are enough Transits charging around) - same rules apply for cam belt
change, but only one belt and a doddle to change. I'll post the output in the
forum tomorrow after I've checked at work. Sorry I can't help with the
implications of mating this engine to your outdrive.
Regards - Oliver - 'Number Two'
Output of the 2.5DI Ford depends upon year and engine code. It varies between 60hp for early normally aspirated up to 75hp for later turbo engines. These figures are DIN HP so are probably a bit on the conservative side. One final point - it's worth remembering these engines are a real heavyweight! Hope this helps.
Regards - Oliver - 'Number Two'
![]()
EXCESSIVE VIBRATION
I have excessive vibration when the engine is running (Ford XLD 1600cc) . It is worst when the boat is idle. A mechanic has suggested the rubber on the engine mountings may have gone hard. The triple flywheel would balance on its central spline (prior to installation. How hard should the rubber mounts be?
Thanks
Brian
RESPONSES
Dick sent this outlining his own experience: -
"I have also installed a Ford 1600 XLD in my boat and I too get a great deal of vibration at idle. It's not too bad when the revs are increased slightly so I've upped the idling speed a little ! The rubber mounts that came from Lancing Marine are VERY hard....my mechanic was in two minds about using them at all, but decided that they must be OK if they were part of the kit ! Maybe we should have used the mounts that my Watermota was on. They were much softer."
Dick
![]()
OUTBOARD TYPE
Can anyone please tell me what type of outboard I should have on my 20' conquest, short, standard or long and what is the best hp for all purpose use. At present I have a Honda 7.5 hp although I don't know what length it is.
regards Danny
RESPONSES
1. Had a Norman 20(although not conquest) and I had a long shaft outboard on it, I believe the transom height was either 21" or23" so that should give you an idea. I had a 9.9Hp 4stroke that pushed it along fine and used half the fuel of my old 8Hp 2stroke (and much quieter), The same engine is now on my Norman 25 and still does a grand job although it needs a lot of throttle when the rivers up and running fast. Hope this helps.
Dave Flint
2. My Norman 20 had a short shaft 25hp Mercury 2 stroke - ran fine but tended to be a bit ragged at low river speeds. On my current 23 I'm using a Honda 7.5 long shaft - somewhat pedestrian but as Dave pointed out, half the fuel costs. Take your pick - if you intend using your Conquest for Estuary/Coastal work go for the 2 strokes and a reasonable horsepower - these hulls will take about 75hp. However if you only intend river/canal cruising a 4 stroke is your best bet - good low speed running, economy & no messy fuel mixing. I would fight shy of hanging more than 15hp on the back - 4 strokes go considerably heavier than 2 strokes. You can identify your Honda from the ID plate - if it says BF75 it's standard shaft, BF75L is long shaft. I've never got to grips with transom height in relation to short or long shaft - it depends on how low the boat sits in the water. What is important is the depth of the anti cavitation plate - this should not be less than 4 inches and can be considerably more. Finally, because they go on forever, don't ignore maintenance - oil changes once a year and if you have no history, cam belt & water pump impeller replacement.
Regards - Oliver - 'Number Two' (why does my boat keep going up & down on it's mooring - has it been raining?)
![]()
INBOARD ENGINE/STERN DRIVE
On the plate where I believe my engine links to my enfield outdrive, a pair of bolts regularly seem to shake themselves free. These are "captive" bolts in as much as they come totally free of the thread but do not fall out into the bottom of the boat thankfully. Alongside these two bolts are two aluminium or alloy looking blocks which will hopefully tell you where I am talking about. Previously I have just put them back and all seemed to be well. However, the last time this happened, I screwed the offender back in and I now seem to have developed a rather unpleasant shake and vibration. This only appears at idle, when I put it in gear and set off the vibration stops. Anyone got any ideas?? I had half a thought that they may both need to be tightened using a torque wrench so that they are "evenly" seated but am still looking for a torque wrench to try this theory. Any ideas or suggestions would be very welcome.
Trevor
RESPONSES
1. Trevor - I tried to get to grips with what you meant. Obviously you have some form of adaptor plate between engine and gearbox and I would guess vibration would be a matter of some form of misalignment especially after only appearing after you have tightened the bolts back up. Correct seating of gearbox/adaptor plate to engine ought to be taken care of by dowels but I am not altogether familiar with how your engine joins to the box. Definitely on a diesel I would tighten the bolts very hard and use loctite on the threads. Other outside possibilities are soft/collapsed engine mounts or even a loose flywheel. Let me know how you get on or mail me with further details.
Happy New Year - Oliver - 'Number Two'
2. Dear Trevor,
I took some photo's of my ford/Enfield combo before lifting it out for a rebuild in 2002.I hope you recognise them as being similar to yours.
Obviously, the engine is bolted onto the timber bearers (fibre glassed battens) and the outdrive is in turn bolted onto the transom. Where the two shafts line up to one another, you can see a type of flexible coupling with two circular plates. Each plate has 4 holes in it, each hole containing a ball shaped rubber bush. Two bolts connect the two plates via aluminium blocks, this leaves two more holes per plate. These holes are bolted to the engine and the outdrive from the nearest respective plates.
The purpose of this is two-fold. The rubber bushes allow some of the shock to be absorbed when either gear is engaged, there being no clutch to allow the drag of the propeller to be gradually "fed in"......some motorcycles have a similar device within the rear wheel. Secondly, the degree of flexibility allows for any error if the engine and outdrive are not exactly in line. If the engine is say 1/8" too high, the shafts would not line up but this device will allow them to be connected and for rotation (drive) still to take place. When re-fitting the engine (or outdrive) it is advisable to ensure they are exactly the same height to relieve this device of unnecessary stress. If this is not done, and there is any great difference in height, then it's life may be reduced.
Make sure there is nothing to foul the rotating parts when the engine is running.
VIBRATION
I wonder whether you have experienced this with the boat in the water ? Have you inspected the propeller ? If you can't haul out easily, then feel it with your hands. You tilt the leg upwards by releasing the catch, this brings the prop nearer to the surface. If you have the de-luxe model like me, then you can wind the handle, and the leg will rotate upwards towards one side of the boat, lifting the propeller out of the water.
Any damage to a blade on the prop will cause vibration. I have had polythene fertiliser bags around the prop on my Albatross before, and this has the same vibrating effect ( I always carry a sharp knife on the boat for this very purpose). Props are specially balanced by the makers, and they can be repaired & re-balanced if you send them back (they can also adjust the pitch to a limited degree if you see fit)
Also regarding the vibration, are you sure nothing has come loose such as the engine or outdrive mountings ? Try turning the engine over with the starting handle (remove the plugs first) & listen for funny noises. Do this with the outdrive in neutral, then forward, then reverse gears. Noises may indicate a problem with one of the gears in the outdrive. Try undoing the-flexi drive altogether, then running the engine for a short while. Does the engine vibrate without the outdrive attached ? If so there may be a loose engine mounting. If not, does the vibration re-appear when the flexi is reconnected ?
My outdrive exudes a constant whining/rumbling noise when underway, indicating a worn bearing-I think at the top. But worn bearings like this wouldn't normally cause vibration. I have a workshop manual for the Enfield leg, I could scan pages & e-mail them if you need to see it.

3. I have just spoken to my neighbour who helped me with the engine re-build. He is a "motor engineer" of the old school now in his 70's, and recognised the flexi coupling as the type used when car engines were not bolted directly to the gearbox. These couplings were used in between the two,in the same way as in the boat. He tells me that at the time, he thought them to be a bit old hat, and tomorrow will give me a more modern version from a mini driveshaft. I will send you a photo of it, and you can decide for yourself whether or not you think it is worth the change.
Unlike me (who knows nothing) he thinks that if for example one of your rubber bushes has disintegrated/fallen out, then this would indeed unbalance the drive sufficiently to cause you to feel vibration
Ash
![]()
INBOARD ENGINE
Hi, My Norman is fitted with a Ford inboard engine and Enfield out-drive. Is this normal/usual? Having dragged it out of the water, do I need to worry about draining any water from the engine as a frost precaution, or does it drain itself? Should I assume the engine must not be run while the boat is out of the water? How difficult is it to convert a small petrol Ford to a similar size diesel? is the marinising kit interchangeable? Who would have supplied the kit? Any and all advice welcome.
RESPONSES
1. That is a very popular combination, mine is the same and very effective too. Spares are a doddle to come by for the engine itself. My marinisation kit is a Bowman and, to be honest, I would not want to do any desperately complicated work on it. I'd pay somebody as they are so damned expensive and that fella in Leicester seems to have a monopoly on spares and stuff. There are two cooling systems, a closed one the same as a car which you need to put in the right mix of antifreeze and the "raw water" cooling system that sucks water out of the canal, pulls it through the engine and spits it out of the exhaust. Out of the water there will still be some water in this system and it would be good practice to do the following. Get a bucket with a correct mix of antifreeze and water, turn of the tap on the water intake on the bottom of the hull, (mine is under the helm position) take off the rubber hose and direct it into the bucket. Turn over the engine a few times until water and antifreeze comes out of the exhaust and put the hose back on. Take out the impeller from the raw water pump and take it home. Frost really finishes these off!! The idea of leaving this part of the system with antifreeze in is to stop corrosion during the inactivity. Most of the recent editions of the boat and canal magazines have articles about wintering boats at the moment.
Trevor
2. After several years of religiously hauling out every year (and paying for the privilege) I'm keeping the boat in the water this winter for as you say those crisp bright days. I reckon every other year out of the water is OK to give the hull a chance to dry out properly and perform hull maintenance, repair & antifoul. Best of all if you know a friendly surveyor, borrow an osmosis probe to test for water absorption in the bilges. As for other winter nasties don't forget to drain freshwater tank, any water heaters & loo. I also remove water pump just in case. Outboards are best tilted out of water to drain. Get a couple of cheap silica gel moisture traps to help with condensation and remove as much soft furnishing as possible. Butane (blue cylinder) is inefficient at low temperatures. Change to propane (red) with new regulator, but check your appliances are compatible. Finally remember our river suffers from alarming changes of level over winter. Happy frostbite!
Oliver
![]()
BALLASTING A NORMAN CONQUEST
I have a Norman conquest and over the last few months have been trying to keep it in a straight line on the canal, the best l can get it is with 5 bags of sand and gravel in the front, 20 engineering bricks per side at the rear and the addition of an outboard rudder. I am also trying not to over compensate but the level of concentration to keep it in a straight line is a constant strain while out cruising, and the wife has given up trying to steer it all together. Has anybody got any advice or tips?
Danny
RESPONSES
1. Does the boat stay straight, or fairly so, when run up to normal cruising speed and then taken out of gear? I had a Conquest for some time and also found her harder to keep on a straight course than some other craft. An extension rudder fitted to the outboard made a _big_ difference, especially at slow speeds. What engine have you got? Some motors have adjustable friction for the pivots, as the motor pivots need to be stiffer when wheel controlled than when on a tiller arm, it prevents vibration in the motor allowing it to wobble about using up lost motion in the steering system. If the boat keeps straight when the engine is not in gear then the engine pivots etc should be checked as the issue is engine based. If there is a consistent desire to turn one way when under power then a trim tab is needed.
If the boat is hard to keep in a straight line in neutral or at tickover you might have an issue with hull distortion. Again, if it is consistent some rudder bias or a little trim tab may cure it.
Conquests are a bit less directionally stable than some, they have less keel and a moderate flat section aft as they were designed with some speed potential in mind. You can (if you must) hang up to 80HP on the transom and expect some 25knots from the hull in flat water, this hull form gives reduced directional stability at slow speeds.
HTH
Andrew Fanner
2. The advert below illustrates what is suggested in a couple of posts. Obviously this is German in origin but I assume somebody over here makes these things as well. (Its a big file !)
Trevor
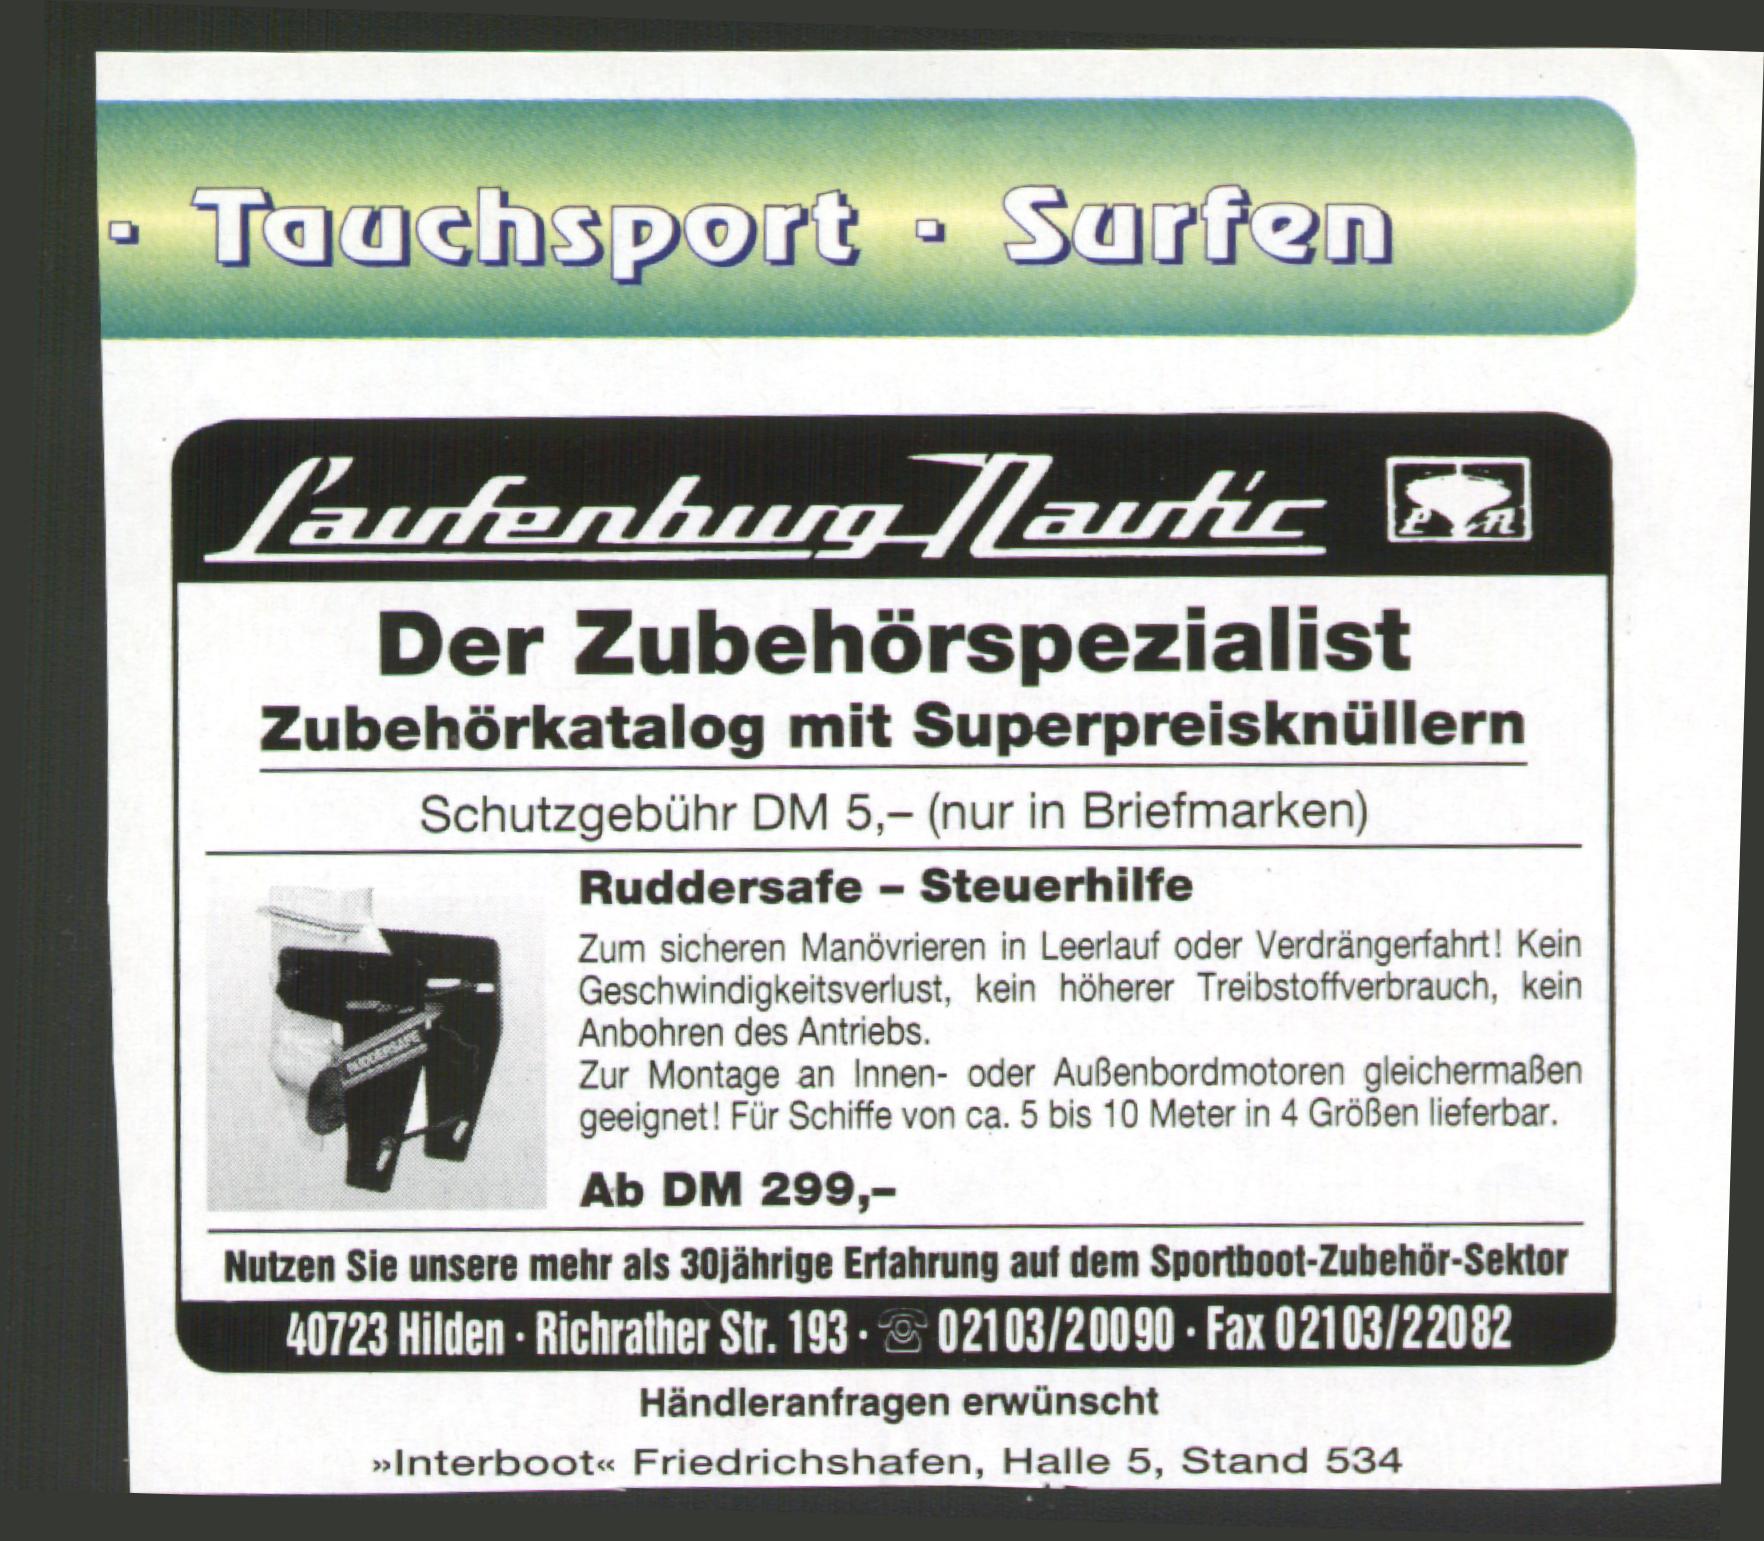
2. I found this distributor of the ruddersafe
as featured on the German ad'
Solution:
Marine engineers and UK distributor of Ruddersafe.
27 Acorn Units, TEL Tel: 01502 716657
Ellough Industrial Estate, FAX Fax: 01502 716657
Beccles,
Suffolk.
NR34 7TD
Simon
![]()
Hi,
This is being raised elsewhere, but I don't know how to make contact. The
problem is directional stability. My outdrive has a small rudder attached. But I
think the problem is mainly due to a delay in the steering coming into force.
You turn the wheel, nothing happens, your turn the wheel some more, nothing
happens, you turn the wheel some mo.....you frantically start turning the wheel
the other way....then back again...etc.
John
RESPONSES
These are only my thoughts and the trial and error solutions
I applied but it worked for me!
The Norman 20/Conquest, as pointed out earlier, was designed for light
coastal/estuary use as well as general river/canal cruising with the capability
of accepting large outboards. The hull design is of the semi-planing type
therefore low speed instability is somewhat inherent. However these models when
fitted with moderate size engines respond well to careful ballasting coupled
with a rudder plate. I ballasted mine with a 125litre cold water tank in the
bows and when fitted with a rudder plate on the 25HP Mercury, never had any
instability problems, except when the water tank was running low!
The larger Norman's which are true displacement hulls are a somewhat different
kettle of fish and can be quite difficult to get to steer straight. All narrow
beam river cruisers, especially when fitted with outboards/outdrives are going
to suffer from wanderlust to a certain extent. The Norman models seem worse than
usual, I suspect because of insufficient keel on the boats. As keel extension is
likely to be prohibitive, other measures should be taken.
When I first bought my 23 I was appalled at the unruly behaviour of her -
constant correction/over correction of the helm coupled with a hilarious zig zag
course down the river made the boat virtually unusable. However, I now have a
boat I can leave the helm when under way, use the loo, and still find her
pointing in roughly the same direction!
First of all make sure the steering coupling is not excessively worn, the
steering tube is securely mounting to the hull and excess play is not evident in
the ball and socket. Both of these components are available from your chandlery.
Make sure the friction bolt on the engine is adjusted to give the correct drag
and that the pivot bearings are not worn and well greased. Trim tabs should not
be necessary at low river/canal speeds but do not remove - these also serve as
sacrificial anodes to inhibit engine corrosion. A moderate size rudder plate is
required, but experiment to find the correct mounting position.
Experiment with ballast at the front. I ended up putting in 320kg. I used 20kg
polypropylene sandbags available from any good builders merchants. These are
clean, easy to handle, and mould themselves to the bilge shape without causing
damage. Trial and error is necessary - only use sufficient to hold a straight
course - any more will make your boat incredibly lazy on the helm. Finally make
sure the outboard/outdrive is mounted far enough in the water. For outboards do
not reduce the manufacturers specified depth of the cavitation plate.
Hope this helps - Regards - Oliver -'Number Two'